Court Dockets
Summary
Court Docket Administration
Court Docket Detail Template
Step 1: Select Process
From the TnCIS Menu, open the Administration folder. Select Court Docket.
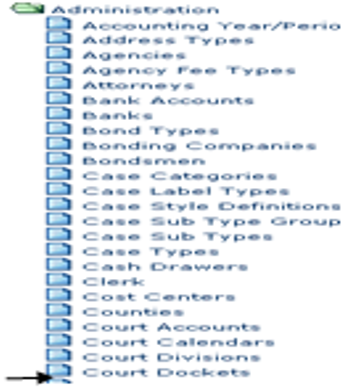
In the Search by, Description will default.
- From the drop down list, select a Court Type.
- Enter the description if searching for a specific docket.
- Click Find Now. A listing of dockets will display for selection.
- In the displayed list. Double click the name of the docket you wish to select, or the user has the option to add a new template to customize their dockets to meet your unique specifications. To add a template for a new court docket, from the screen top, click Add New.
Step 2: Add New Docket Template
The Court Docket form will open with four screen/tabs: General, Selection Criteria, Options to Include, Audit. The user will make selections and fill in the available information.

Step 3: General Form
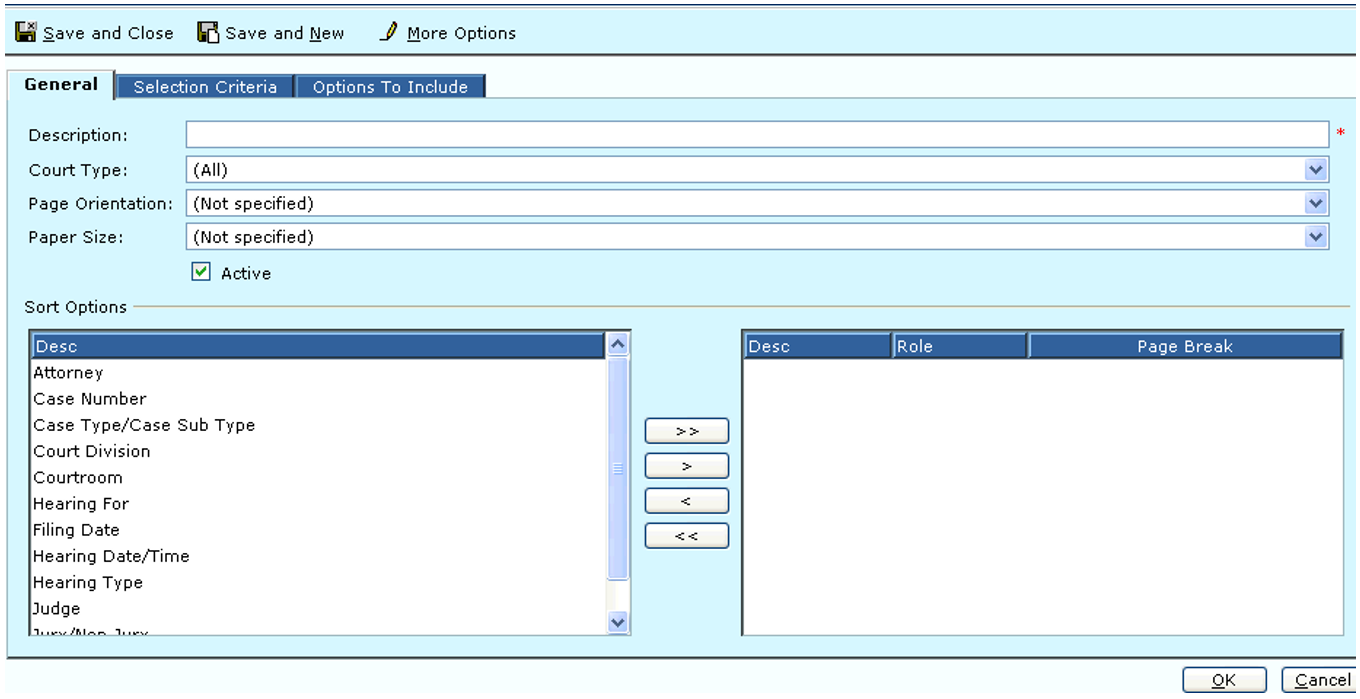
- Enter the Description name for this particular docket.
- Select the Court Type from the drop down.
- Select from the drop down what Page Orientation to be used when generating the report.
- (Not Specified) signifies to the system to not default the page orientation and requires the user to specify when they print a report.
- Landscape…signifies to the system to default the page orientation to “Landscape” and allow changing it if necessary, when they print the report.
- Portrait…signifies to the system to default the page orientation to “portrait” and allow the users to change it if necessary, when they print the report.
- Select the box to allow the user to select what Paper Size the report will be printed on.
- (Not Specified) …signifies to the system to not default the page size and requires the user to specify when they print a report.
- Legal…signifies to the system to default the paper size to “Legal” and allow users to change it if necessary, when they print the report.
- Letter…signifies to the system to default the paper size to letter and allow users to change it if necessary, when they print the report.
- The Active check box will show whether a docket is active, the check box automatic ally defaults to checked when you add a new docket. Only Active Court Dockets will display for printing.
- Sort options are available to customize this docket to your needs. Sorting by any option that has the ability, to sort by a “role” will first sort all ‘party’ and ‘attorney’ records for the cases then bring the specific role to the top. Highlight the Sort option/options and use the middle arrows to customize as needed. The order of the sort is defined by top to bottom of those items selected.
- Page break options are available to customize this docket to your needs.
Step 4: Selection Criteria
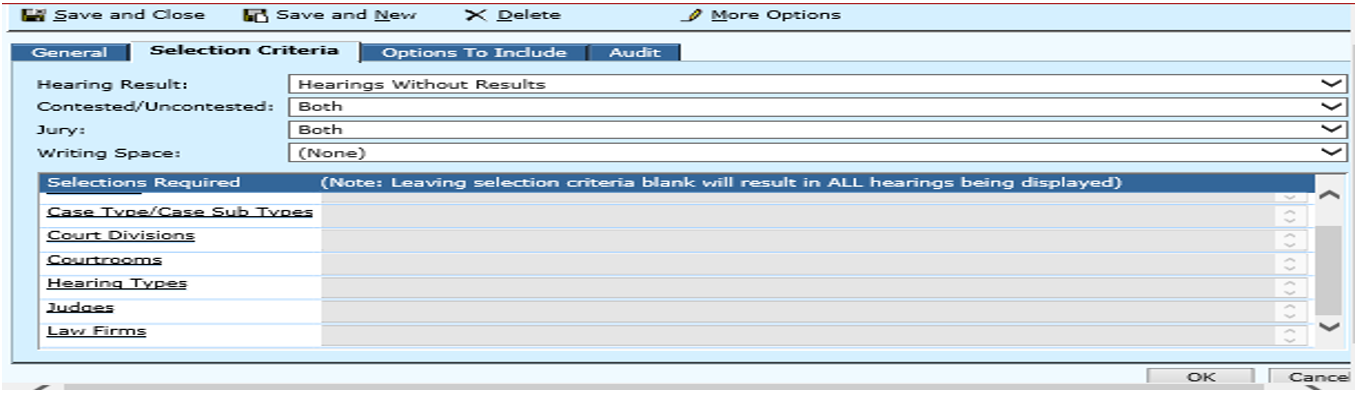
- Select from the drop down-Hearing with Results, Hearing Without Results or All.
- Select from the drop down: Contested, Uncontested or Both
- Select from the drop down: Jury, Non-Jury or Both
- Writing Space…Valid options are None and any number from one to ten rows.
- Check box…Separate defendant by their “Defendant Code” on the docket. This is only used by Circuit Courts if they want to separate by Defendant Code.
- Select Box “Use white space reduction”…This allows a user to select whether or not they want to display the “Include the selected by information on the docket” and “Include the sorted by information on the docket: check boxes on the Options to Include tab.
- A Selections Required option is available for all attorneys, case/case subtypes, court divisions, courtrooms, hearing types, judges, and officers. Note: Leaving selection criteria blank will result in ALL hearings being displayed. Clicking on a selected hyperlink allows a user to pick a single or multiple attorney or officer etc. for only their hearings.
Step 5: Options to Include
- A list of options to include tab will have all currently available options from all different dockets that are being phased out. Each option is bound to a case type civil or criminal where applicable. Check the options you want include on your docket setup. This will allow users to select/deselect options they may want to add or remove. Save all selections.

Step 6: Audit
- An Audit tab has been added to allow simple audit viewing for forms that use Process Description.
- After all the set- up is complete, the user may proceed to Print Reports Menu Option to print their court dockets. Upon selecting Court Docket Detail Report a listing of available pre-set dockets are available for the user to select and will default all parameters that were previously set up in Court Docket Administration.
Rev. 03/242021