Add Citation
Summary
This option allows you to enter a criminal citation into the TnCIS System. You will enter the general case information and enter the information about the citation.
Criminal
Add Citation
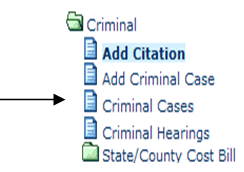
Step 1: Select process
After opening the Criminal folder, select Add Citation to add a new criminal traffic citation case.
Step 2: Record case summary information
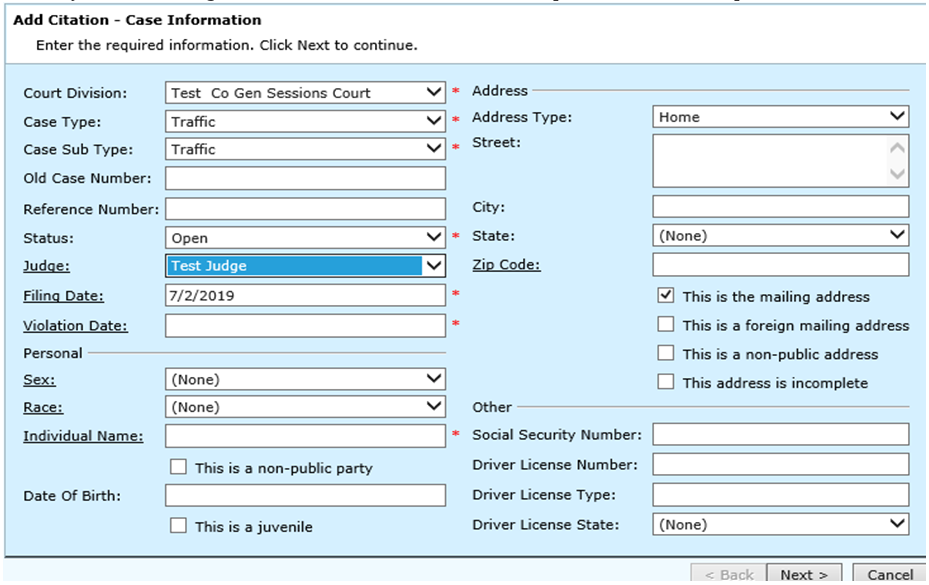
Enter/select the general information about this new criminal case. Some of the information is defaulted but can be changed if necessary. After recording all information click the Next> button to proceed to the next step.
Field Descriptions:
| Court Division | Required | If the correct court division is not automatically displayed, use the drop- down menu and select the division/type of court being used for this case. |
| Case Type | Required | If the correct case type is not automatically displayed, use the drop down menu and select the case classification category in which the case will fall under. |
| Case Sub Type | Required | If a secondary/sub case type is being used, use the drop down menu and select the specific type of case within the main case type. The Case Sub Type can be a case type of its own. |
| Old Case Number | Optional | Enter the old case number if this is an old case. If an Old Case Number is not entered, the case will be assigned the next sequential case number. |
| Reference Number | Optional | This is the case number of a related case. For example, it could be the General Sessions case number before the case was created in Circuit, or the pre-existing case number before TnCIS. If an existing case number is entered, the reference number may include the docket book and page number. |
| Status | Required | This indicates the status of the case and will default to 'Open'. If not correct, use the drop down menu, and select the correct status of the case. |
| Judge | Required | This is the judge assigned to this criminal case. If the correct judge is not automatically displayed, use the drop down menu, and select the judge being used for this case. Use the Judge hyperlink to add a new judge or edit an existing judge. |
| Filing Date | Required | Enter the date the case is being filed. The current system date will be displayed. To enter another date, make the entry or click on the Filing Date hyperlink to make a date selection from the calendar. (Usually date officer was sworn in) |
| Sex | Optional | Enter the code related to the sex of the defendant. Use the drop down menu to make a selection. |
| Race | Optional | Enter the code related to the race of the defendant. Use the drop down menu to make a selection. |
| Individual Name | Required | Enter all or part of the defendant's name. Now hit the tab key. This will take you to the business/individual search and you will see the names currently on file. You may choose a name if it is the defendant on this case, or you may enter the new person using the 'Add New' option. |
| Date Of Birth | Optional | Enter the defendant's date of birth. |
| This is a Juvenile | Optional | Check this box if this person is a juvenile. |
| Address Type | Optional | This indicates the type of address being entered. Use the drop down menu to make a selection. This field will default to 'home'. |
| Street | Optional | Enter the street address for the defendant. More than one line of address can be used. |
| City | Optional | Enter the city of the address of the defendant. The city should correspond with the zip code. Note: You can enter the zip code and the city and state will automatically be entered. |
| State | Optional | Use the drop down menu to select the desired state. Note: You can enter the zip code and the city and state will automatically be entered. |
| Zip Code | Optional | Enter the address zip code. Click on the Zip Code hyperlink, to view zip codes currently on file. If the city and state is not entered, they will automatically be displayed if a zip code entered is currently on file. |
| This is the mailing address | Optional | Check this box if the address is used as a mailing address only and this is not the physical address of the plaintiff/defendant. |
| This is a foreign mailing address | Optional | If this is a foreign address, check this box. |
| This is a non-public address | Optional | If this address should not be viewed by the public, check this box. This is used as a level of security, consisting of confidential, sealed and sealed with indictment. |
| Social Security Number | Optional | Enter the defendant's social security number. |
| Driver's License Number | Optional | Enter the driver's license number for the defendant. If you get a driver license number error, delete the driver license number, and select 'none' for driver license state. |
| Driver's License Type | Optional | Enter the code related to the type of driver’s license is held by the defendant. |
| Driver's License State | Optional | Enter the abbreviation of the state where the defendant currently has a Driver license. The state should correspond with the standard state abbreviations. Use the drop down menu to select from state abbreviations currently on file. If it is a Tennessee Driver License Number, this will give you an error if this state is not TN. |
Step 3: Add Charge Information
Enter/select the information about the charge. Enter the information as prompted. After recording all of the information, click the Next> button to proceed to the next step.
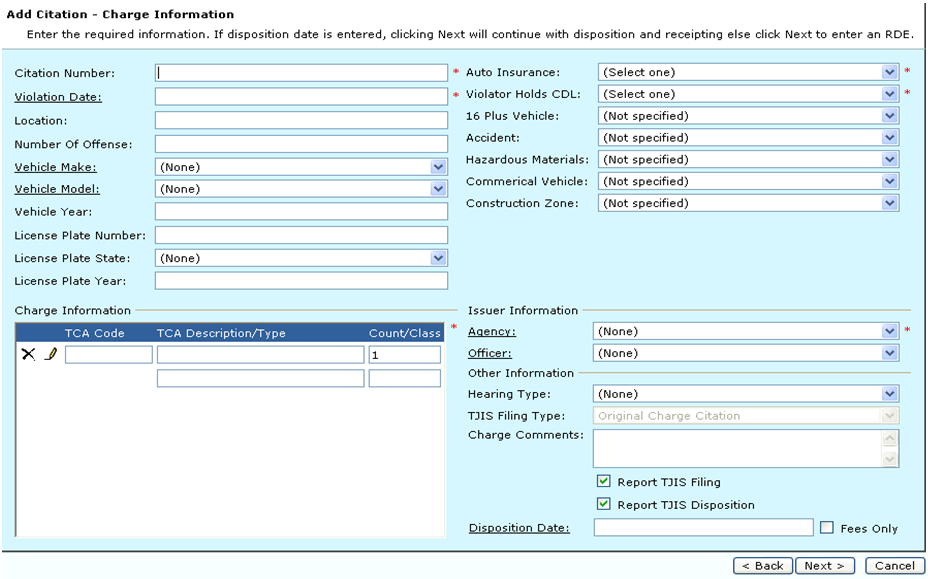
Note: 1) If a user is adding a new case and it has the same violation date and same defendant a pop-up will appear giving you the option to add the charge to the existing case so that a criminal case can be defined and reported as a single case or set of charges in one court proceeding with the incident concerning a single defendant occurring on same date. “Yes” will open up the Criminal window for the existing case and let you proceed to add the new charge on the existing case. “No” will allow you to enter a new case.
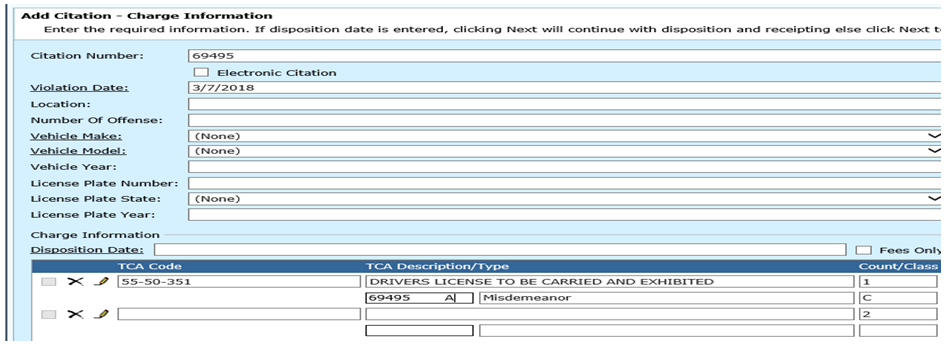
2) In the Add Citation Wizard, the system will pre-fill the citation number that is entered in the div where you enter the TCA Code, the TCA will be split in half and the left side will be the pre-filled citation number and the user will put the citation suffix in this box as it is now required to make each charge number unique. This applies to all charges regardless of if it has a TCA or Ordinance Type.
Field Descriptions:
| Citation Number | Required |
Enter the citation number associated with an order issued by the police to appear before a judge (usually for a traffic violation) at a later date. Note: The system will prompt you if the citation number that you are entering already exists in the system. You can choose to proceed or change the number. |
| Violation Date | Required | Enter the date the violation occurred. You may use the Violation Date hyperlink and select a date from the calendar. |
| Location | Optional | Enter the location where the offense occurred. |
| Number of Offense | Optional | Enter the number of offenses. |
| Vehicle Make | Optional | Using the drop down menu, select the vehicle make from the list. You may use the Vehicle Make hyperlink to add a new make. |
| Vehicle Model | Optional | Using the drop down menu, select the vehicle model from the list. You may use the Vehicle Model hyperlink to add a new model. |
| Vehicle Year | Optional | Enter the model year of the vehicle. |
| License Plate Number | Optional | Enter the vehicle's license plate number. |
| License Plate State | Optional | Enter the state where the vehicle is registered. You may use the drop down menu to select the state from the list. |
| License Plate Year | Optional | Enter the year of the vehicle's license plate. |
| TCA Code | Required | If TCA code is unknown, click on the pencil icon under Charge Information for additional options. In the TCA description/type text box, you can type in a description of the charge (example for "speeding" type in "sp" then hit the tab key and charges will appear.) Note: entering in the first two numbers of the TCA code will also display charges. Verify that the TCA Type, Court and Class fields are correct. |
| Posted Speed | required for a speeding charge | If the citation involves speeding, enter the posted speed limit. |
| Cited Speed | Required for a speeding charge | If the citation involves speeding, enter the cited speed |
| Auto Insurance | Optional | Using the drop down menu, select ‘Violator has insurance’ or select ‘Violator does NOT have insurance’. |
| Violator Holds CDL | Required | Using the drop down menu, select ‘Violator does hold a CDL’ or ‘Violator does not hold a CDL. *Please Note: If ‘Violator does hold a CDL’ is selected all remaining fields are required. |
| 16 Plus Vehicle | Optional | Using the drop down menu, select ‘16+ Passenger vehicle was involved’ or select 16+ Passenger Vehicle was not involved’. |
| Accident | Optional | Using the drop down menu, select ‘Accident was Involved’ or ‘Accident was not Involved’. |
| Hazardous Materials | Optional | Using the drop down menu, select ‘Hazardous Material was Involved’ or ‘Hazardous Materials was not involved’. |
| Commercial Vehicle | Optional | Using the drop down menu, select ‘Commercial Vehicle was Involved’ or ‘Commercial Vehicle was NOT involved’. |
| Construction Zone | Optional | Using the drop down menu, select ‘Offense was in a Construction Zone’ or ‘Offense was NOT in a Construction Zone’. |
| Agency | Required | Use the drop down menu to make a selection for the agency that made the charge against the defendant. Click the Agency hyperlink to add a new agency or edit an existing agency. |
| Officer | Optional | Select from the drop down menu the name of the arresting officer. Select the Officer hyperlink to add a new officer or edit an existing officer. |
| Blood Alcohol Level | Optional | Enter the blood alcohol level if one needs to be entered. |
| RACF ID | Optional | Verify RACF ID. This field will default. |
| Hearing Type | Optional | Select the type of hearing the defendant will have. Use the drop down menu to make a selection. |
| Judge | Required | If there is a Hearing Type, you will then enter/select the Judge. Use the drop- down menu to make a selection. Click the Judge hyperlink to add a new judge or edit and search an existing judge. |
| Courtroom | Optional | Use the drop down menu to select the courtroom for the hearing. |
| Hearing Date & Time | Required | If there is a Hearing Type, you will enter the hearing date and time. Enter the date or you can use the Hearing Date hyperlink to select a date from the calendar. Then, enter the time for the hearing. |
| TJIS Filing Type | Required | Enter/select the code associated with the TJIS filing type. Use the drop- down menu to make a selection. For a new citation, this will be "Original Charge Citation". |
| Charge Comments | Optional | Enter any additional comments about the charge such as sentencing information. |
| Report TJIS Filing | Optional | Check this box if this case should be included in the TJIS filing. The default will be a check mark. |
| Report TJIS Disposition | Optional | This box indicates whether the disposition for this charge is to be reported to TJIS. The default will be a check mark. |
| Disposition Date | Optional | Enter the date of the disposition. Click the Disposition Date hyperlink to view the calendar and select a date. This option is used if the disposition is entered at the time the citation is entered. |
| Fees Only | Optional | Check this box to add the fees to a case. |
**If disposition date is entered then you will see the following screens**
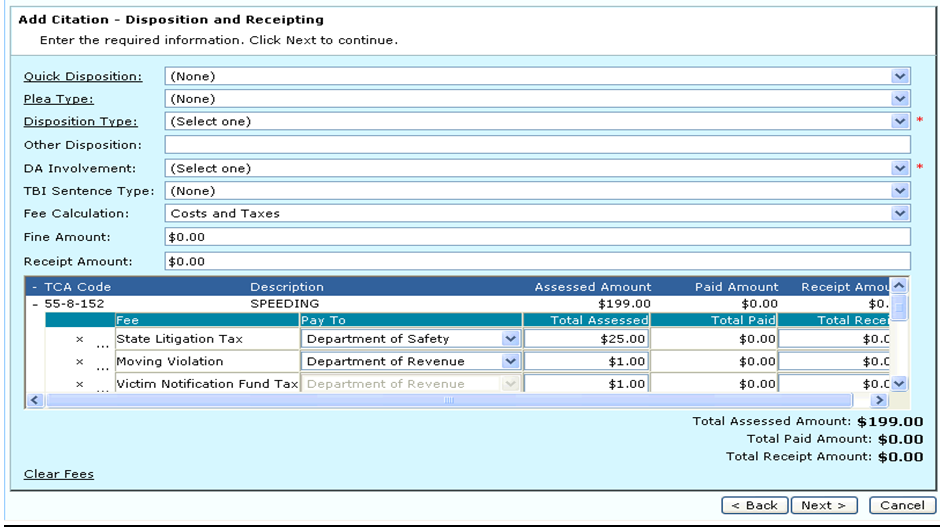
You can change the fee calculation or enter a fine in their respective fields. You can also add new fees if necessary. The screen above will be seen if a disposition date is entered.
***** You will continue to this screen only if a Disposition Date is not entered*****
Rule Docket Entry
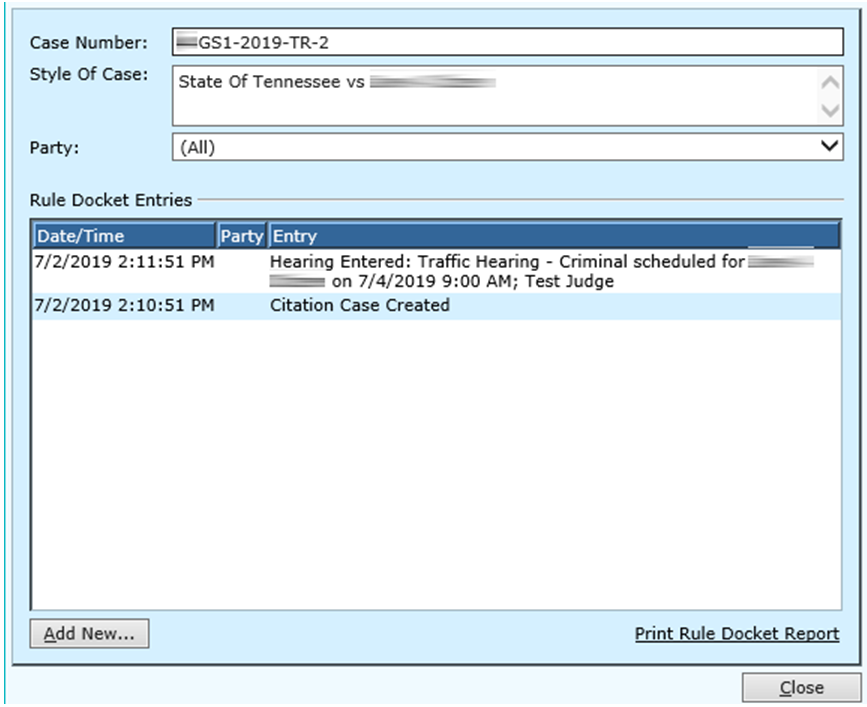
The RDEs will be displayed. To edit, double click the appropriate line. To add a new RDE, click the Add More button. To delete one of the RDEs, select the appropriate line and then click the Remove button. If all is correct, click the Next> button to proceed. You can click the <Back button to go back to the previous screen. Cancel will delete all the charge information.
Completing Add Citation
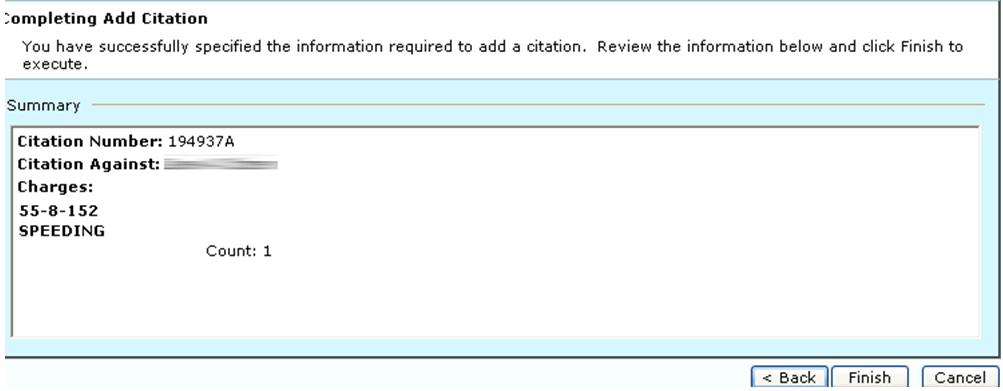
This screen will be displayed, and you will click Finish to complete the process. If the information is not correct, click the <Back button and make any changes necessary. The message "Please wait while files are being updated" will be displayed.
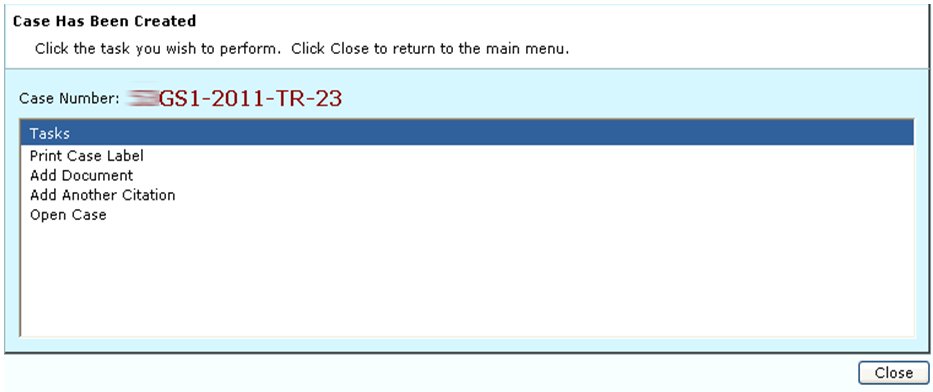
You can select to go into any of the tasks pertaining to this criminal case. Select one of the tasks or click Close to end and return to the main TnCIS menu.
**You will continue through this process only if a Disposition Date is entered**
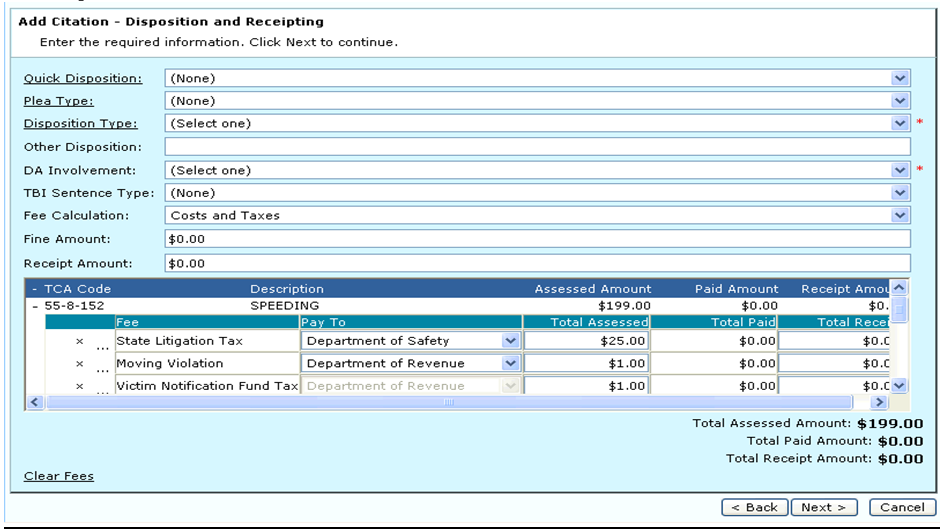
After entering a disposition date, the Disposition and Receipting screen will be displayed. Complete the information as prompted. To view the details for the amounts charged, click the + by the appropriate line for the TCA Code. If any information on previous screens needs to be updated, use the <Back option. If all information is correct, click the Next> button to proceed. Cancel will delete all the citation's information and return to the main menu.
Field Descriptions:
| Quick Disposition | Optional | Enter/select the quick disposition. Use the drop down menu to make a selection. Click the Quick Disposition hyperlink to add a new quick disposition type. You can also use the Quick Disposition hyperlink to edit the type that has been selected. |
| Plea Type | Optional | Select the plea type. Use the drop down menu to make a selection. Click the Plea Type hyperlink to add a new plea type. You can also use the Plea Type hyperlink to edit the type that has been selected. |
| Disposition Type | Required | Select the disposition type. Use the drop down menu to make a selection. Click the Disposition Type hyperlink to add a new disposition type. You can also use the Disposition Type hyperlink to edit the type that has been selected. |
| Other Disposition | Optional | If applicable, enter a disposition other than a standard criminal disposition type. |
| TBI Sentence Type | Optional | Use the drop down menu to select the TBI sentence type. |
| Fee Calculation | Optional | Select the type of fee calculation. Use the drop down menu to make a selection. |
| Fine Amount | Optional | Enter the amount of the fine, if applicable. |
| Receipt Amount | Optional | Enter the amount to receipt for this case. |
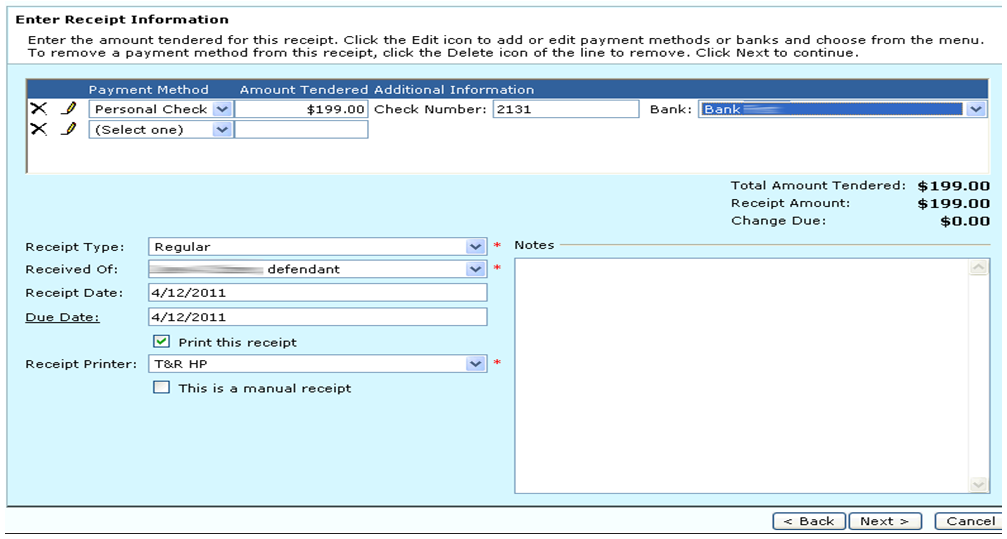
Enter the receipt information requested.
Field Descriptions:
| Payment Method | Required | Use the drop down menu to select the payment type. To look up a payment type, select the Additional Options icon. |
| Amount Tendered | Required | Enter the amount for this payment type. The total amount tendered for all payment types must equal the Total Receipt Amount shown at the bottom of the screen. If amount is more than receipt amount, you will be prompted for "issue check for change due." Check this box if necessary. Checking this will create a disbursement for the change due. |
| Batch | Required | Select the batch for this receipt. Use the drop down menu to make a selection. Click the Batch hyperlink to add a batch. You can also use the Batch hyperlink to edit the batch that has been selected. |
| Receipt Type | Required | Select the type of receipt. Use the drop down menu to make a selection. |
| Received Of | Required | Enter/select the name of who is paying the receipt. Use the drop down menu to make a selection. If the person who is paying the receipt is not shown on the drop- down menu, select "Other...” |
| Other Received Of | Required | This is only displayed if "Other..." is selected for the Received Of field. Enter the name of the person paying the receipt. Click the Other Received Of hyperlink to access names on file. From there you can add a new name or select an existing name. |
| Receipt Date | Required | Enter the date the receipt was issued. |
| Due Date | Optional | Enter the date the receipt is due. Click the Due Date hyperlink to select a date from the calendar. The due date is the date that the disbursement will be batched for check printing. |
| Print this receipt | Optional | Check this option if you want to print the receipt. |
| Receipt Printer | Required | If you are going to print the receipt, select the printer to be used for the printing. Use the drop down menu to make a selection from available printers. |
| This is a manual receipt | Optional | Check this box if a manual receipt is being issued. If checked, you will be prompted to enter manual receipt number. |
| Notes | Optional | Enter any additional information about the receipt. |
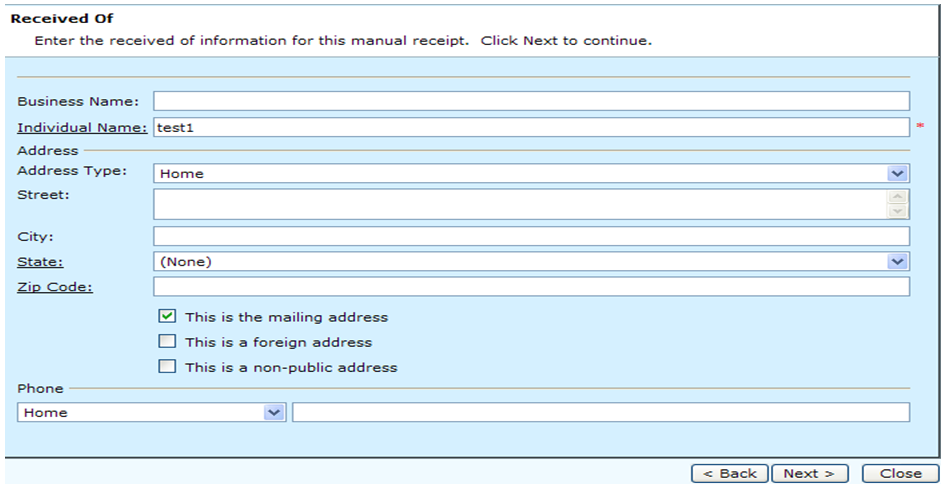
When the receipt has been entered, you will then enter the information about who paid the receipt. Enter the information as prompted and then click the Next> button to proceed. If any information on previous screens needs to be updated, use the <Back option. Cancel will delete all of the citation's information and return to Step 2.
Field Descriptions:
| Business Name | Optional | If applicable, enter the name of the business that paid the receipt. |
| Individual Name | Required | Enter the name of the person making payment. Click the Individual Name hyperlink to access names on file. From there you can add a new name or select an existing name. |
| Address Type | Optional | This indicates the type of address being entered. Use the drop down menu |
| Street | Optional | Enter the street address for the person paying the receipt. More than one line of address can be used. |
| City | Optional | Enter the city of the address. The city should correspond with the zip code. Note: You can enter the zip code and the city and state will automatically be entered. |
| State | Optional | Enter the state abbreviation of the address. The state should correspond with the zip code and standard state abbreviations. Use the drop down menu to select from state abbreviations currently on file. Note: You can enter the zip code and the city and state will automatically be entered. |
| Zip Code | Optional | Enter the address zip code. Click on the Zip Code hyperlink to view zip codes currently on file and make a selection or add a new zip code. If the city and state is not entered, they will automatically be displayed if a zip code entered is currently on file. |
After entering the address, you can check the appropriate box to indicate if this is a mailing address, foreign mailing address, non-public address, or if the address is incomplete.
| Phone | Optional | Enter the phone number of the person paying the receipt. The default type of number is the "Home" phone number. To add another phone number, use the drop down menu to select the type and then enter the phone number. |
Rule Docket Entry
The RDEs will be displayed. To edit, double click the appropriate line. To add a new RDE, click the Add More button. To delete one of the RDEs, select the appropriate line and then click the Remove button. If all is correct, click the Next> button to proceed. You can click the <Back button to go back to the previous screen. Cancel will delete all of the charge information.

Step 4: Citation summary
When the information is complete, this screen will be displayed that summarizes the citation. If any information is incorrect or you know of changes that need to be made, use the <Back option. If all information is correct, click the Finish button to proceed. Cancel will delete all of the citation's information and return to the main menu. When you click the Finish button, a box will pop-up that says, "Please wait while files are being updated".

Step 5: Case has been created
When finished with adding all the information on a citation, this screen will be displayed. Select a task to perform or click Close to return to the main menu.
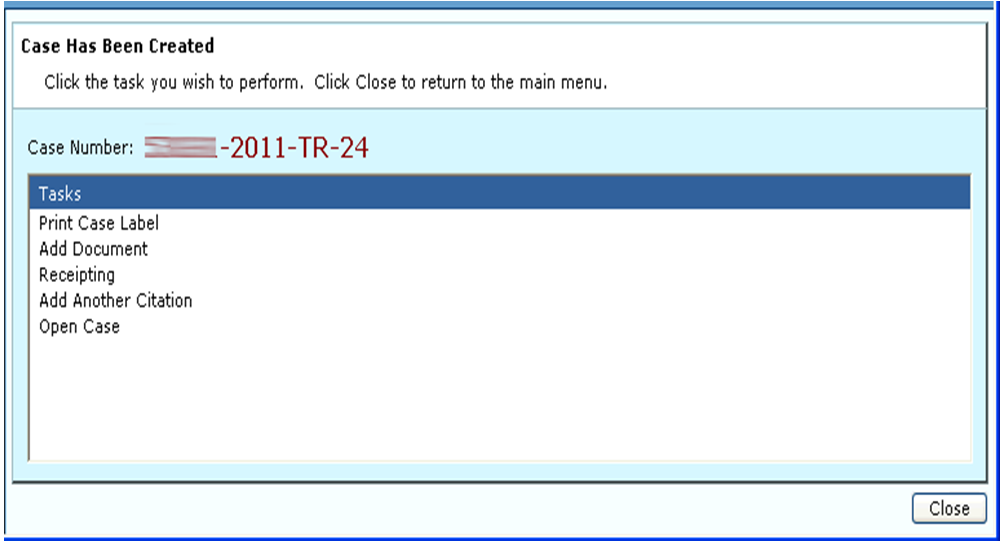
Click the “Add Another Citation” hyperlink to add another citation using the same person or charge.
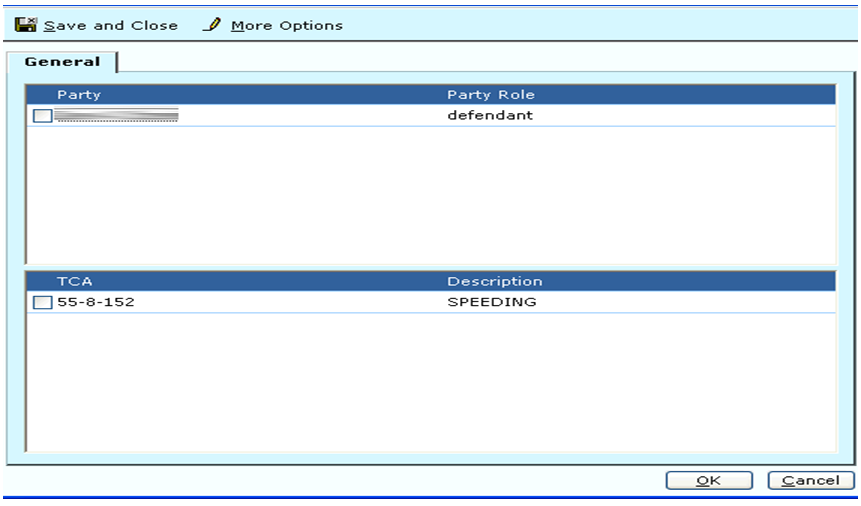
Check the box that applies and hit OK. It will save that information for the next citation you add.
Rev. 03/24/2021