Parcels Search and Parcel Tasks
Summary
“Parcels” is a search where parcels loaded, imported, or added in the system can be searched. The following search options are available to use when searching for a parcel: Parcel Number, Party Name, Trustee Receipt Number, Property Address, District, Map Number, Control Map Number, Land Sale Number, Public Utility Number and Scheduled Sale Date.
Delinquent Taxes
Parcels
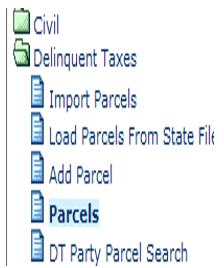
Select Parcels from the Delinquent Taxes folder.
Step 1: Enter Parcel Search Criteria
Select a Search By option and enter criteria information specific to the search option. Click Find Now to initiate search. Field descriptions for each search by can be found below
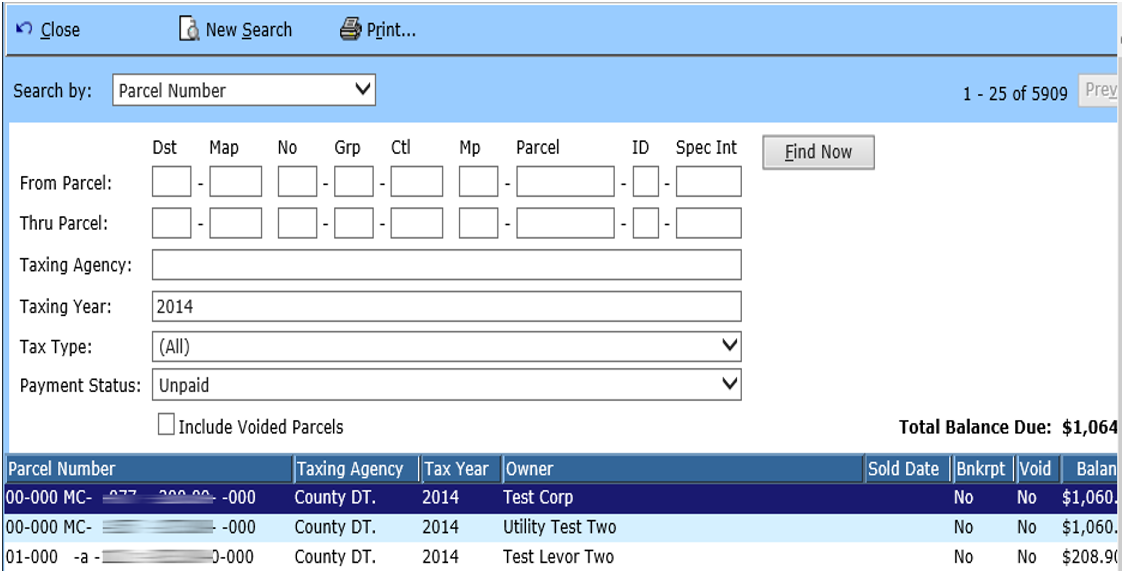
System will display a Result list. Double Click the parcel you wish to maintain.
If desired results were not returned, click the New Search option at the top of the screen to enter new search criteria.
Check the Include Voided Parcels check box to include parcels that have been voided in your search results.
The Total Balance Due will be helpful when determining how much is owed on multiple parcels that are related. Example: Total Balance due for a particular party that owes for multiple parcels.
Click the Print option to print the information that appears on the screen.
Click Close to exit the search.
Click Next and Previous to go between pages of results.
Field Descriptions:
| From Parcel | Optional | Enter the parcel number that you are searching for. |
| Thru Parcel | Optional | Enter the parcel number that you are searching for. |
| Taxing Agency | Optional / Required | Enter the taxing agency for the parcel if it is known. Either a Taxing Agency or Taxing year must be entered to search for the parcel number. |
| Taxing Year | Optional / Required | Enter the taxing agency if it is known. Either a Taxing Agency or Taxing year must be entered to search for the parcel number. |
| Tax Type | Optional | Select the type of taxes that are delinquent from the drop down. Options are all real or personal. |
| Payment Status | Optional | Select a status of all, paid or unpaid to narrow your results. |
| Party Name | Required | Enter a party that is on the parcel you are searching for. |
| Trustee Receipt Number | Required | Enter the receipt number that is given by the Trustees office to search for a parcel tied to that receipt. |
| Include Voided Parcels | Optional | Check this check box with any search by to include the voided parcels within your search results. |
| Property Address | Required | Enter the physical address for the parcel as search criteria for a specific parcel. |
| District | Required | Enter a district number to pull up all parcels for a certain district. |
| Map No. | Required | Either the alpha (map) part or the number part of a map number to search for a parcel by its map number or con. |
| Control | Optional / Required | Enter the control number to search for a group of parcels using that control number. Either control or map must be entered for the control map number search by. |
| Map | Optional / Required | Enter the to search for a group of parcels using that control number. Either control or map must be entered for the control map number search by. |
| Group | Optional | Enter a group to help narrow the control map number search results, if one is known. |
| Parcel | Optional | Enter a parcel number to help narrow the control map number search results, if one is known. |
| Land Sale Number | Optional / Required | Enter a Land Sale Number if it is known when using the Land Sale Number search by. If Land Sale Number is no known, a From Sold Date or Thru Sold Date must be entered to produce any results. |
| From Sold Date | Optional / Required | Enter a From Sold Date to narrow results from a specific sold date. If a sold date is not entered, a land sale number or Thru Sold Date must be entered. |
| Thru Sold Date | Optional / Required | Enter a Thru Sold Date to narrow results thru specific sold date. If the Thru Sold Date is not entered, a Land Sale Number or From Sold Date must be entered. |
| Public Utility Number | Required | Enter a Public Utility Number to pull up a parcel by the Public Utility Number. |
| From Scheduled Sale Date | Optional / Required | Enter a From Scheduled Sale Date to see results for what parcels are to be sold for that particular date. Either the From or Thru Scheduled Sale Date. |
| Thru Scheduled Sale Date | Optional / Required | Enter a Thru Scheduled Sale Date to see results for what parcels are to be sold for that particular date. Either the From or Thru Scheduled Sale Date. |
Step 2: Viewing and Maintaining Parcel Information
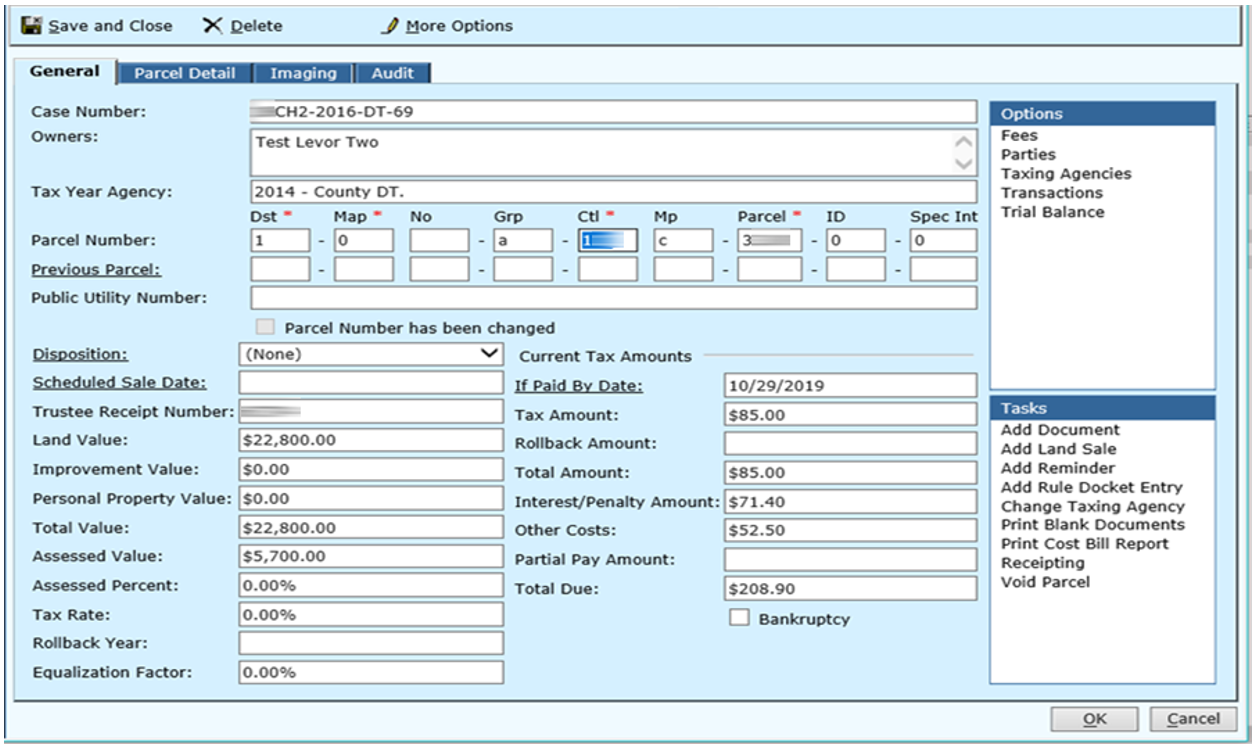
General Tab will appear. This tab displays general information about the Property owner and the parcel. (EX: Amounts owed, Parcel # etc.)
Click the Parcel Detail Tab to see detailed information/descriptions about the parcel itself. (EX: Property Description, Deed book information, etc.)
If a parcel is Bankrupt, an additional tab will appear containing bankruptcy information (File Date, Claim Date, Closed Date, Bankruptcy Docket number). Note: If parcel needs to be marked as bankrupt, check the Bankruptcy check box on the bottom of the General tab.
Save and Close will exit the Parcel.
Delete will delete the parcel. Warning messages will appear if parcel cannot be deleted.
Click More Options to Print screen shot of the parcel or to review an Audit of the form to see when the last change was made on the parcel and who made it.
Step 3: Use Options/Tasks within a Parcel
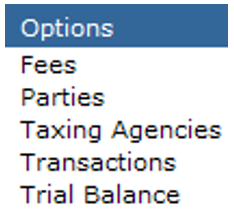
Options are actions that have already occurred on the parcel. Click an option to view detailed information about that option or to perform some of those options again (EX. Land Sale). Tasks are actions that have not yet been performed for the parcel (EX. Add Land Sale). Select a task to perform that particular task for the parcel.
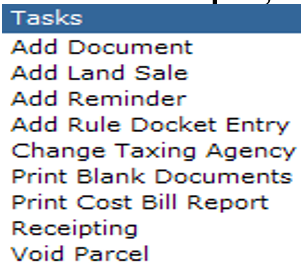
Options/Tasks that are available within a parcel are Add a Land Sale, Change Taxing Agency, Voiding a Parcel, Fees, Parties, Transactions, Trial Balance, Add Document, Add Reminder, Add Rule Docket Entry, Print Blank Documents, Print Cost Bill Report, Receipting, and Void Parcel. Each task/option is listed below in detail.
Add a Land Sale
Select this option/task to add the sale of a delinquent property.
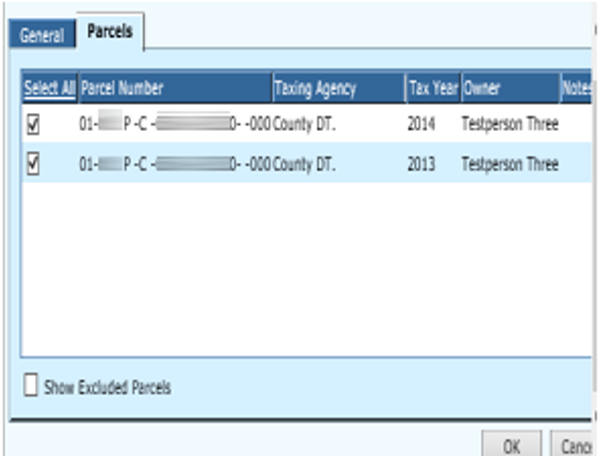
Please Note: A new “Parcels Tab” has been added to the Land Sale form. This tab will load a list of parcels (both real and personal with the real properties pre-selected and the personal available to be selected) to associate to the Land sale. This selection will give the user the ability to allow them to select and deselect the parcels to be included in the land sale properly in the report. If a parcel meets the parcel number criteria for being added to a land sale, but the parcel is ineligible for inclusion, a check box will appear at the bottom of the list (labeled “Show Excluded Parcels”) and this will allow users to see additional parcels that are not eligible and tell why the parcel cannot be included in the land sale.
Enter the Land Sale Number and the Sold Date. Once the sold date is entered, all the parcels added to the list with a tax type of “Real” will be pre-selected. “Personal” tax type parcels must be manually selected for inclusion. Click the Parcels tab to see all associated parcels.
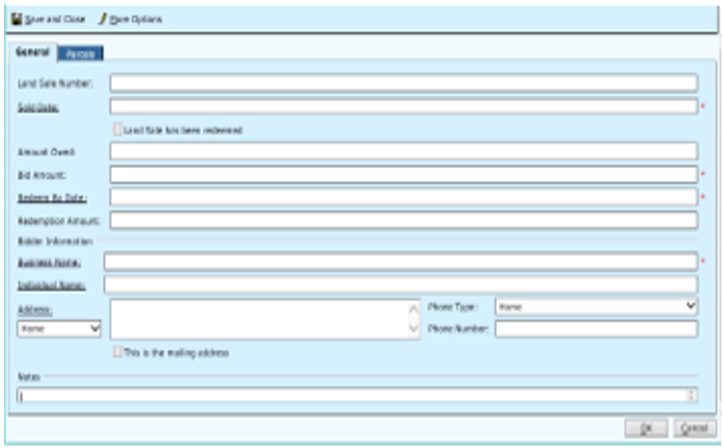
Field Descriptions:
| Land Sale Number | Optional | Enter the Land Sale Number for the sale of the property. |
| Sold Date | Required | Date the land sale took place. Click the hyperlink to select a date from the calendar. This date will determine the amount of taxes owe. Click the Parcels Tab to select or deselect parcels that are included in this land sale. |
| Amount Owed | Optional | The amount of taxes owed for the parcel determined by the sold date. |
| Bid Amount | Required | Amount purchaser bids for the property at the land sale. |
| Redeem By Date | Required | The property owner or interest holder (heir etc.) has to pay the redemption amount by this date in order to keep ownership of the property. |
| Redemption Amount | Optional | The property owner must pay the amount of the bid plus interest to retain the property. |
| Business Name | Optional / Required | Enter the Business name of the business purchasing the property at land sale. Click the hyperlink to search for a business or edit the name selected. |
| Individual Name | Optional / Required | Enter the Individual name of the individual purchasing the property at land sale. Click the hyperlink to search for an individual or edit the name selected. |
| Address | Optional | Click the address hyperlink to add a new address or edit an existing address for purchaser. |
| This is the Mailing Address | Optional | This check box can be edited from the Address hyperlink. This check box indicates which address listed for the party is the mailing address. |
| Phone Type | Optional | Type of phone number listed for the party. |
| Phone Number | Optional | Phone number for the party selected. |
Land Sale
Double Click to view land sales that have taken place for the parcel. Field descriptions can be found above.
Add New to add a new land sale on parcel.
Tasks available from the land sale are: Receipt Land Sale, Void Land Sale, and Issue Deed of Sale.

Receipt Land Sale
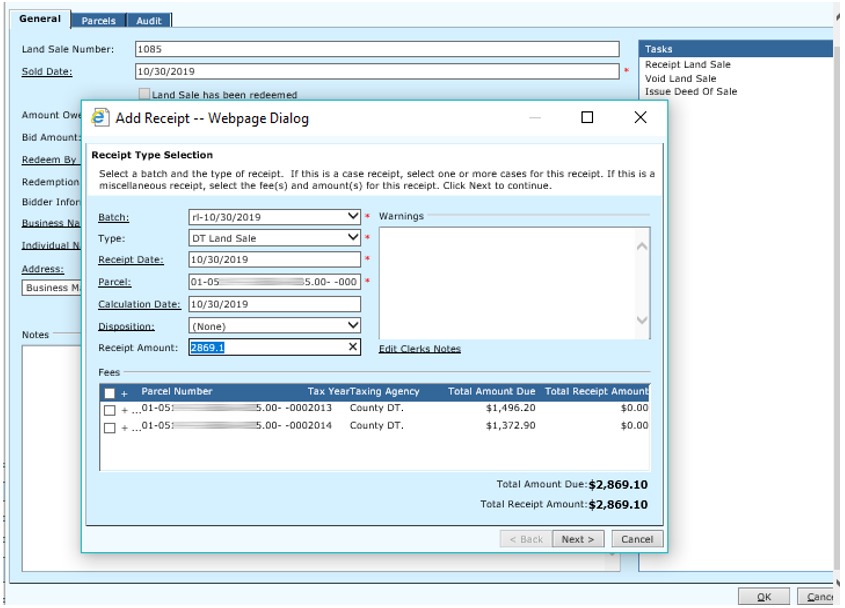
Click this hyperlink to receipt the money received from the land sale.
Select batch ID. All other fields will default. Enter the disposition if necessary. Then select the check box beside parcel(s) or enter a receipt amount to receipt the land sale.
Refer to page 74 ‘DT Receipting’ section for more detail.
Void Land Sale
Click this hyperlink to void a land sale that has been performed in error.
If Land Sale has not been receipted, then only the Void Date and Reason will display. This will place a void date on the land sale information only.
If the Land Sale has been receipted and you want to issue a refund check to the bidder then proceed with this option.
If Land Sale has been receipted and you do not want to issue a refund check but need to void the receipt, then use the Void Receipt process on page 84.
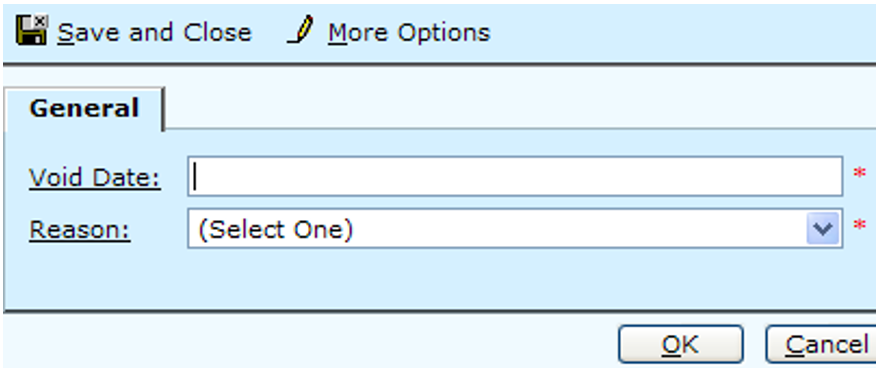
Field Descriptions:
| Void Date | Required | Enter the date the void is taking place. Click the Void Date Hyperlink to select a date from the calendar. |
Reason |
Required | Select a reason from the drop down. |
| Description | Required | This field will display if land sale was receipted. Will default to “Refund due to voided Land Sale”. This description can be modified. |
| Transaction Type | Required | This field will display if land sale was receipted. Select the Transaction Type from the drop down. |
| GL Account | Required | This field will display if land sale was receipted. Enter GL account information, so that previous transaction can be corrected. |
Select Save and Close or OK to complete the void once all information has been entered.
Select Cancel to exit the Void Land Sale process.
Select More Options to Print the screen.
Note: If clerk does not want to issue a refund check but needs to void the receipt then follow the Void Receipt process.
Issue Deed of Sale
Once the land sale is final, redemption period is ended. Click this hyperlink to print the deed of sale.

At the Document View screen, the user will click Add New.
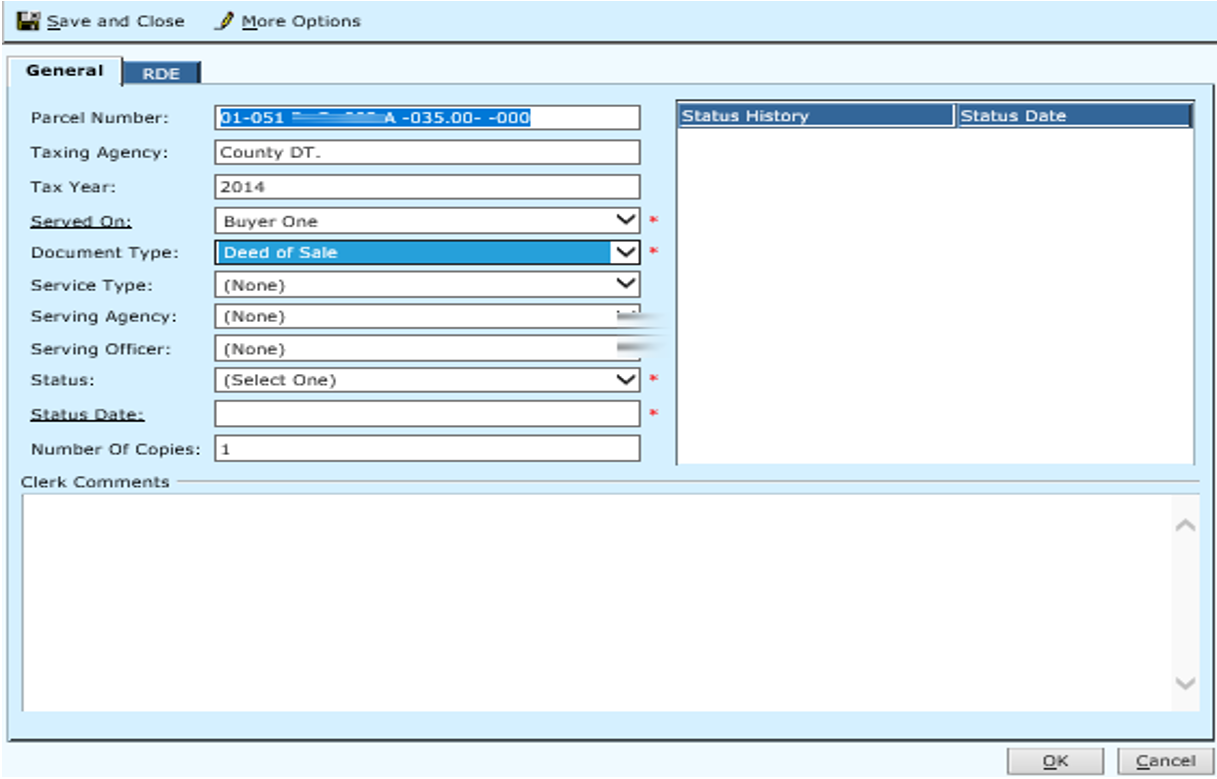
Enter document information and select Document Type: Deed of Sale.
Click on the Print Document hyperlink to print or view the deed of sale.
Click OK or Save and Close to save document information.
Click Cancel to cancel document process.

The Document View screen displays the Deed of Sale as produced.
Edit document information then double-click on the document type.
Change Information if necessary. (EX: change status, serving agency, etc.)
Click OK or Save and Close to save any changes made.
Change Taxing Agency
Change the primary Taxing Agency.
Click Save and Close or OK to save changes.
Click Cancel to exit without saving changes.
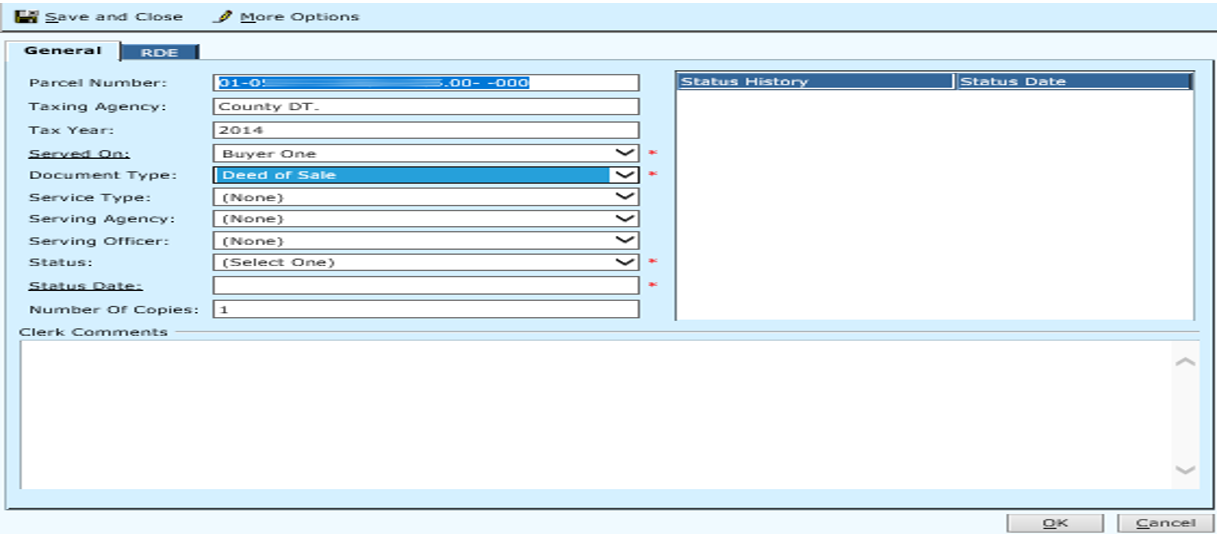
Field Descriptions:
| Current Taxing Agency | Optional | The current Taxing Agency listed on the parcel. |
| Current Taxing Year | Optional | The Tax Year for the parcel. |
| New Taxing Agency | Optional | Select the Taxing Agency that should be used for the parcel. |
Taxing Agencies
This option allows you to View the existing taxing agencies for the parcel.
ADD an Agency: The option to Add an agency as a secondary taxing agency is available from this option. Select secondary agency from the field that displays (None).
Once a secondary agency has been selected, click the ellipses (…) to view/edit the Agency information.
An ‘X’ will also appear to the left of the ellipses. Click the ‘X’ if you wish to remove the taxing agency.
Click ‘Save and Close’ or OK to save changes.
Click ‘Cancel’ to exit without saving changes.
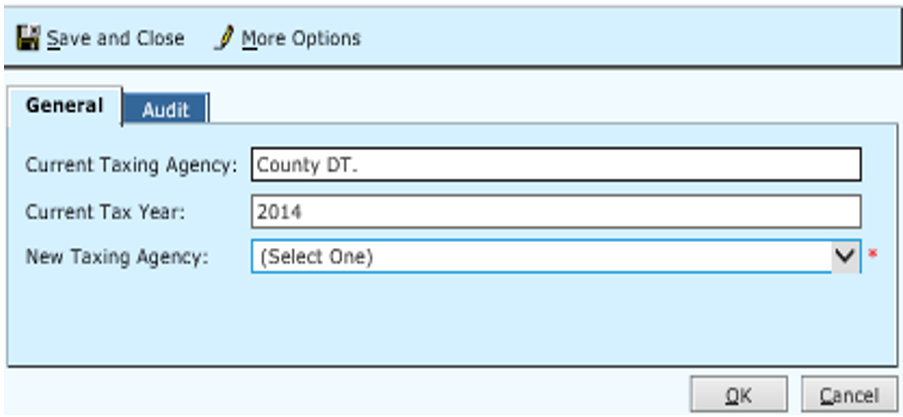
Void Parcel-Task
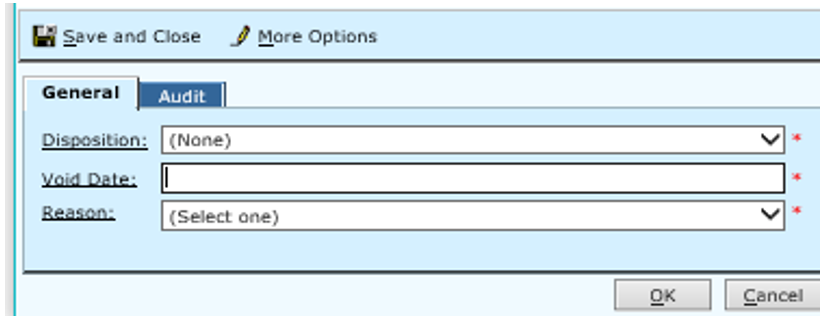
Use this option to Void a parcel that has been entered in error. Note: A parcel cannot be deleted if fees are still owed.
Click ‘Save and Close’ or OK to save changes.
Click ‘Cancel’ to exit without saving changes.
Fees
Click the Fees hyperlink to view the fees on the parcel. This will give you a breakdown of what specific fees are owed and whom they are going to be paid. The clerk can modify or add additional fees to a parcel.
Field Descriptions:
| Disposition | Required | Select a disposition from the drop down. Click the hyperlink to Add a new disposition or Edit an existing disposition. |
| Void Date | Required | Enter the date the parcel is being voided. Click the hyperlink to pick a date from the calendar. |
| Reason | Required | Select a reason for voiding the parcel from the drop down. Click the hyperlink to Add a new reason or Edit an Existing reason. |
NOTE: The only fee that cannot be modified is the DT Interest/Penalty fee.

Click the ‘If Paid By Date’ hyperlink to select a date from the calendar. Changing the date will recalculate the totals for the fees listed.
Click the Add New fee hyperlink to add a new fee.
Click Clear Fees to completely clear all fee amounts owed.
Click the Adjustment Ledger hyperlink to view the Adjustment Ledger for this parcel.
Click Save and Close or OK to save changes and exit the screen.
Click Cancel to leave the fee screen and not save changes.
Click More Options to Print the current screen or to Audit when the last changes were made to the Fees.
Parties

Click on the ‘Parties’ option from the menu. The party view will list the parties currently on the case.
Double click a party to edit that party
Click Add New to add a new party to the Parcel
Click Close to exit the Party View screen
Transactions
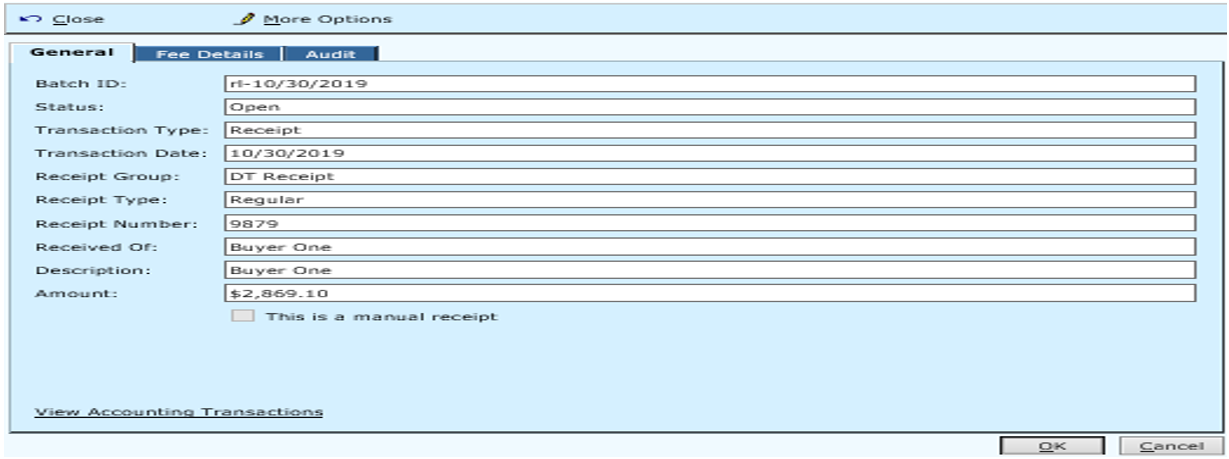
Click the Transactions option to view transactions that have taken place on the parcel. (EX: Receipts, Checks, Transfers, Etc.)

Double click a Transaction to view detail information for that transaction.
Click Close to close screen
The General tab will list the basic transaction information.
The Fee Details tab will list the specific fees involved in that particular transaction.
Click Cancel to close screen.
Trial Balance- Options
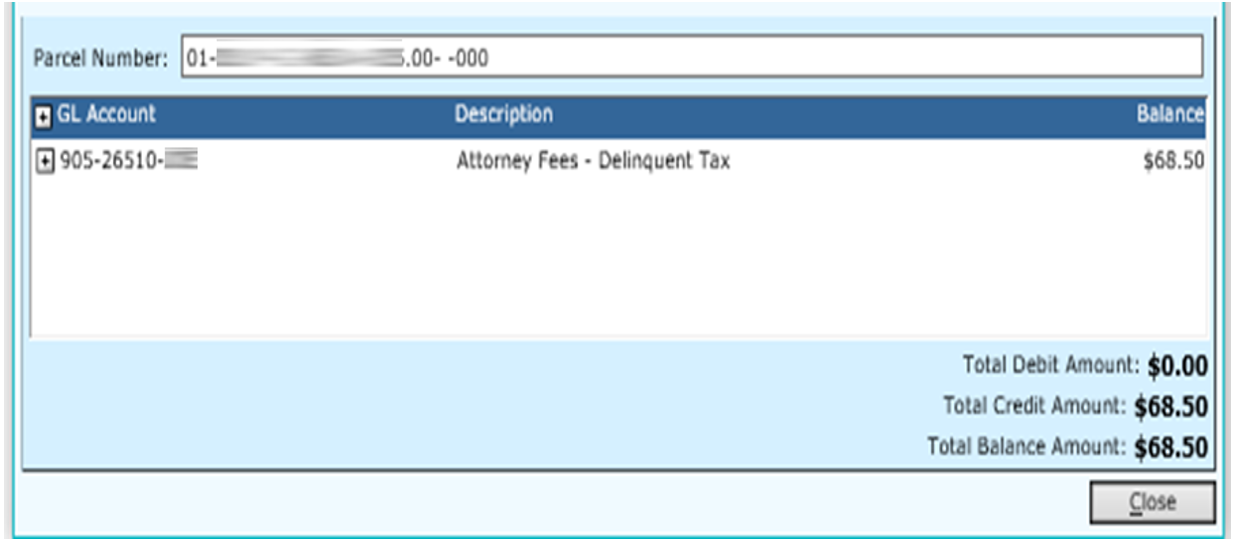
The Trial Balance option will list the money that is holding to be paid out for that case. It is a reflection of what is being held in the docket trial balance for that parcel. It lists amounts, GL Account and other pertinent information.
Click Close to close screen.
Add Document
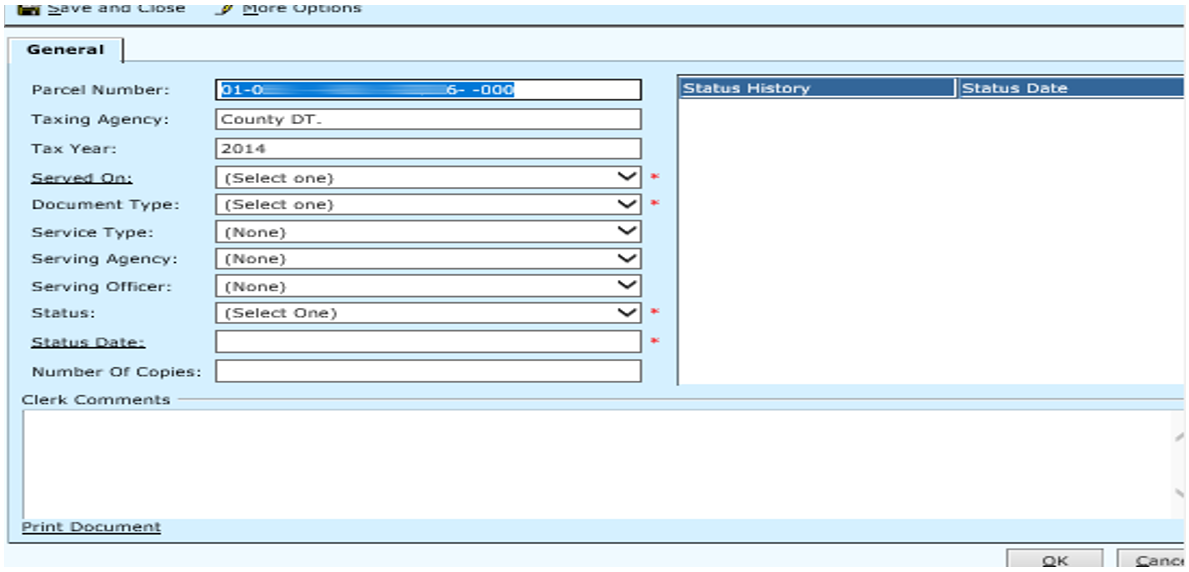
Add a Document to the parcel by selecting the Add Document task.
Field Descriptions:
| Parcel Number | Optional | Read only display of the parcel number. |
| Taxing Agency | Optional | Read only display of the Taxing Agency. |
| Tax Year | Optional | Read only display of the Tax Year. |
| Served On | Required | Party whom the document will be served on. |
| Document Type | Required | Type of document being served. |
| Service Type | Optional | Method of service used to process the document. |
| Serving Agency | Optional | Agency providing service of the document. |
| Serving Officer | Optional | Officer providing service of the document. |
| Status | Required | Select Status of the document from the drop down. |
| Status Date | Required | Select the date you are changing the status. Click the Status date hyperlink to select the date from a calendar. |
| Number of Copies | Optional | Enter the number of copies you wish to print. |
| Clerk Comments | Optional | Free form field for clerk to add any additional notes for their benefit. |
Click the Print Document hyperlink to print the document.
The Status History/Status Date field lists all status changes for the document.
The same screen above will be seen when the user selects the option ‘Documents’ and double clicks a document.
Add Reminder
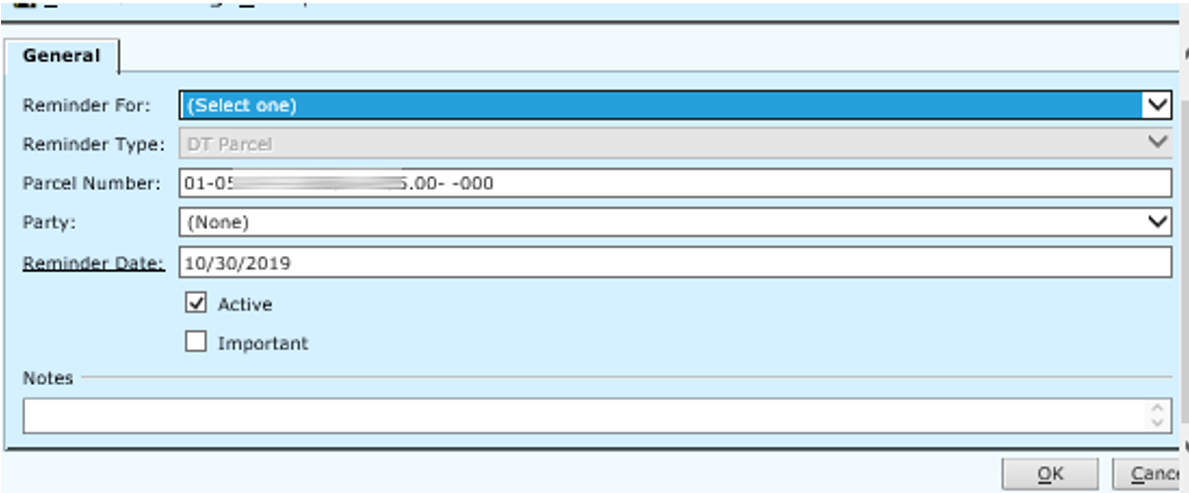
Add Reminder is a task that will give the user the ability to add a reminder for the parcel which they are viewing. Click the Add Reminder hyperlink to view the reminder screen below.
Field Descriptions:
| Reminder For | Required | Select the user the reminder will be for from the drop down. |
| Reminder Type | Required | Read only display of the Reminder Type. |
| Parcel Number | Optional | Read only display of the Parcel Number. |
| Party | Optional | The party that the reminder is about. |
| Reminder Date | Required | Date you want to be reminded. Click the hyperlink to select the date from a calendar. |
The Active check box will default checked, indicating that this is an active reminder. Notes MUST be entered for the reminder. Simply enter the information that you wish to be included in the reminder.
Click Save and Close or OK to save the reminder and exit.
Click Save and New to save this reminder and add more reminders.
Click More Options to Print the screen.
Click Cancel to completely exit the process.
Add Rule Docket Entry
Click Add Rule Docket Entry to add any necessary rule docket information for the parcel.
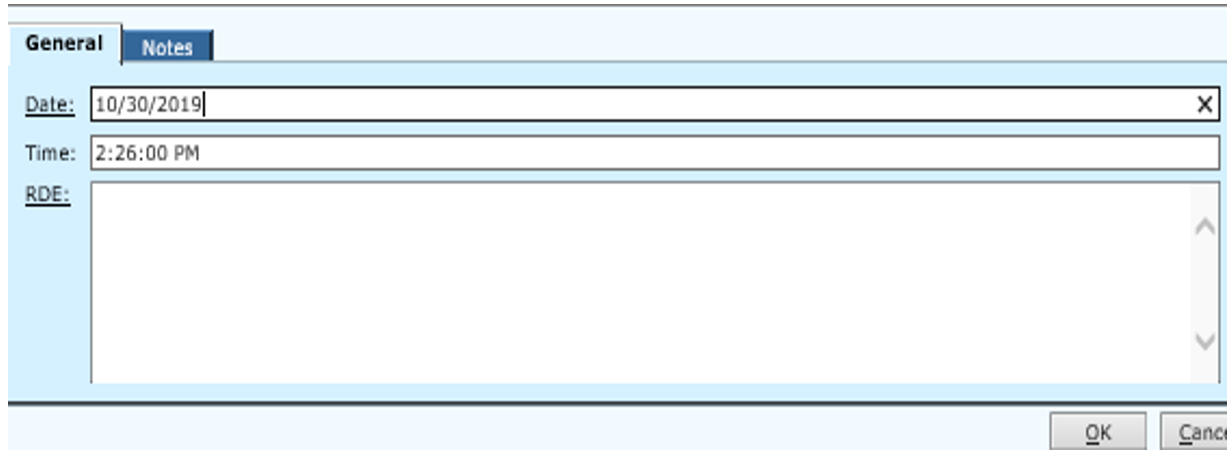
The current date and time will default for the Rule Docket Entry but they can be modified.
Enter RDE information in the RDE text box.
Click on the Notes Tab to enter any notes.
Print Cost Bill Report
Print the Cost Bill for the report.
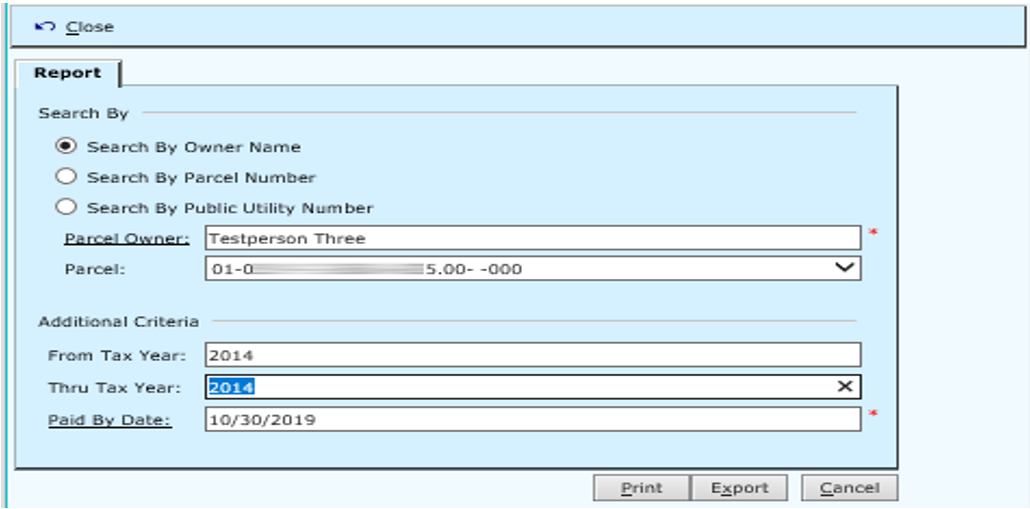
The Cost Bill Report will list the fees associated with the parcel- Beginning Balances, Total Paid and Total Owed.
Click Print to View/Print (physically) the report.
Click Cancel or Close to exit the criteria screen.
Field Descriptions:
| Owner | Required | The Parcel Owner’s name will default in this field. Click the Owner hyperlink to search for an owner if necessary. |
| Parcel | This field will default to the parcel that you are currently in. If more than one parcel is tied to this particular owner, you can select another parcel or select the option of all to view all the cost bills for that owner. | |
| If Paid By Date | Required | Will default to the current date. Click the If Paid By Date hyperlink to select the date from a calendar. |
Print Blank Documents
Select this task to Print a Blank Document for use.

Double clicking the Document in the list will print that document directly to the document printer.
Receipting
Refer to the Receipting section of this chapter.
Rev. 05/03/2021