Add a Child Support Case
Summary
This allows you to enter a civil case into the TnCIS System. You will enter the general case information and then enter information about the plaintiff and defendant. When the case information is complete, you will select filing information. With all the information complete, you can then print a receipt for any money received.
Civil
Add Child Support Case
Step 1: Select process
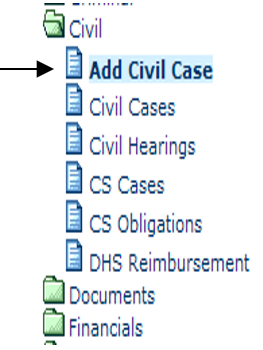
After opening the Civil folder, select Add Civil Case to add a new Child Support case.
Step 2: Record case summary information
Enter/select the general information about this new child support case. Select any of the case subtype (s) which has child support special processing (i.e., Child Support, Divorce with minor children, etc.). The “This is a Child Support Case” check box should appear. Check this box to denote the case as a child support case. After recording all information click the Next> button to proceed to the next step.
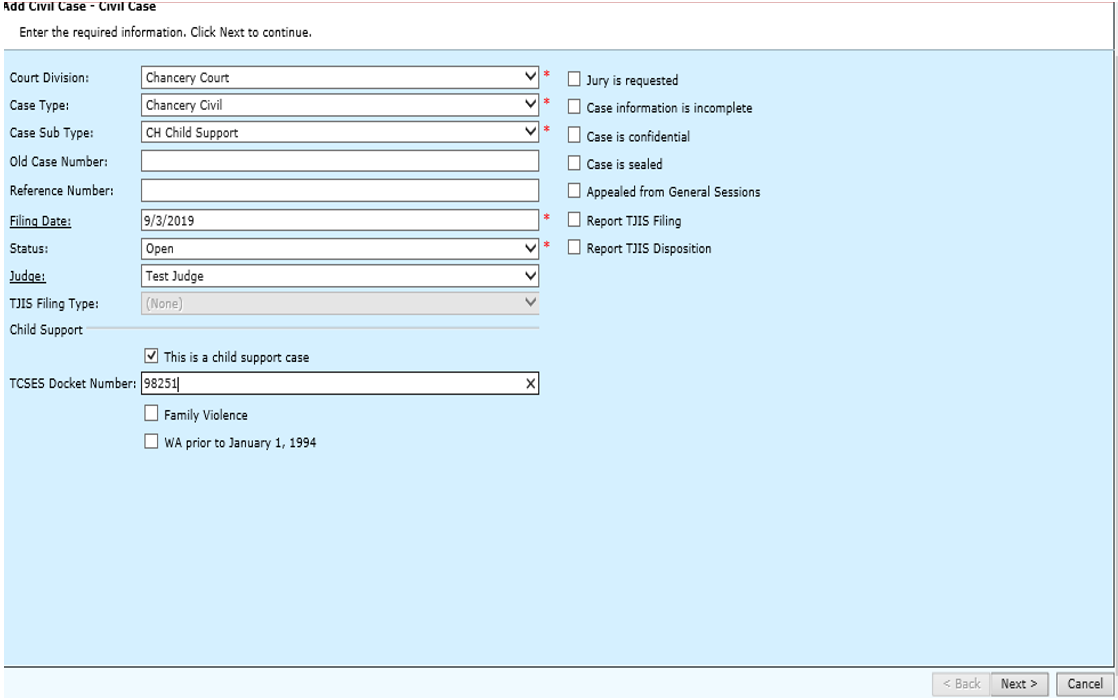
Field Descriptions:
| Court Division | Required | If the correct court division is not automatically displayed, use the drop- down menu and select the division/type of court being used for this case. |
| Case Type | Required | If the correct case type is not automatically displayed, use the drop down menu, and select the case classification category in which the case will fall under. |
| Case Sub Type | Optional | If a secondary/sub case type is being used, use the drop down menu, and select the specific type of case within the main case type. The Case Sub Type can be a case type of its own. |
| Old Case Number | Optional | Enter the old case number. If an Old Case Number is not entered, the case will be assigned the next sequential case number. |
| Reference Number | Optional | Case number of a related case. For example, it could be the General Sessions case number before the case was created in Circuit, or the preexisting case number before TnCIS. If an existing case number is entered, the reference number may include the docket book and page number. |
| Filing Date | Required | Enter the date the case is being filed. The current system date will be displayed if this is not an old case. To enter another date, make the entry or click on the Filing Date hyperlink to make a date selection from a calendar. Type the = or + sign will enter the current date. Use the – or + keys to decrease/increase the date. |
| Status | Required | This indicates the status of the case and will default to 'Open'. If the correct status is not automatically displayed, use the drop down menu and select the correct status of the case. |
| Judge | Optional | This is the judge assigned to this civil case. If the correct judge is not automatically displayed, use the drop down menu, and select the judge being used for this case. Use the Judge hyperlink to add a new judge or edit an existing judge. |
| TJIS Filing Type | This field will automatically default in when the case sub type is selected. | |
| This is a Child Support Case | Optional / Required | This check box will only appear for a case subtype with the special processing of child support. It must be checked if a child support case is being entered. |
| TCSES Docket Number | Optional | Enter a TCSES docket number if the number already exist for the case. If a number is not entered, TnCIS will automatically assign a number upon completion of case entry. |
| Family Violence | Optional | Check this box to denote a history of violence for one or more parties on the case. This information will then be sent to a registry through the TCSES Interface files. |
| WA Prior to January 1, 1994 | Optional | Check this box if a Wage Assignment was entered on a case before January 1, 1994. “If the wage assignment was established before 1994, the case may not be flagged as a TCSES case and can be collected and distributed by the clerk without going through the DHS central collection center.” |
| Jury is requested | Optional | Check this box if a jury has been requested to hear this case. |
| Case information is incomplete | Optional | If all the case information has been entered and is not complete, check this box. |
| Case is confidential | Optional | If the information recorded for this case has been requested to be kept confidential, check this box. |
| Case is sealed | Optional | Check this box if the case has been ordered sealed. |
| Report TJIS Filing | Optional | If the TJIS filing information from this case needs to be reported, check this box. If this is an old case, the box will default to un-checked. If an old case number is not entered, the box will default as checked. |
| Report TJIS Disposition | Optional | If the TJIS disposition information from this case needs to be reported check this box. If this is an old case, the box will default to un-checked. If an old case number is not entered, the box will default as checked. |
Step 3: Add Plaintiff and Defendant information
Enter/select the information about the plaintiff and defendant. You are prompted for the same information about the plaintiff and the defendant. Enter the information as prompted. After recording all the information, click the Next > button to proceed to the next step.
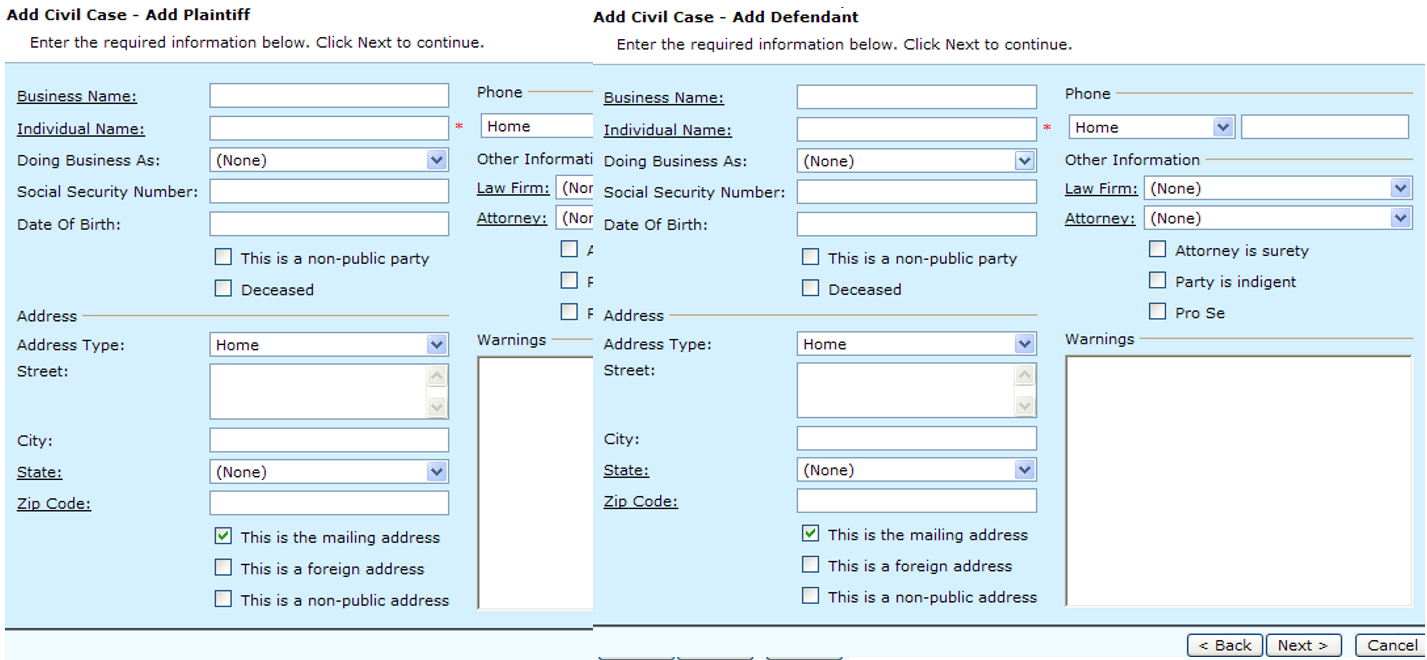
Field Descriptions:
| Business Name | Required | Enter the business name of the plaintiff/defendant. Click on the Business Name hyperlink to view business names currently on file and select or add a new business name. Either an Individual Name or Business Name must be recorded. |
| Individual Name | Required | Enter the full name of the plaintiff/defendant. Click on the Individual Name hyperlink to view names currently on file and, select or add a new name, or edit an existing name. Either an Individual Name or Business Name must be recorded. |
| Doing Business As | Optional | If the business or individual is doing business under another name, enter that information here. If this is not applicable, (None) should be the entry here. Click on the Doing Business As hyperlink to add a new DBA or edit an existing DBA. Use the drop down menu to select from a DBA currently on file. |
| Social Security Number | Optional | If an individual is listed as the plaintiff/defendant enters the person's social security number. |
| Date of Birth | Optional | If an individual is listed as the plaintiff/defendant, not just a business name; enter the person's date of birth. |
| Address Type | Optional | This indicates the type of address being entered. Use the drop down menu to make a selection. |
| Street | Optional | Enter the street address for the plaintiff/defendant. More than one line of address can be used. |
| City | Optional | Enter the city of the address of the plaintiff/defendant. The city should correspond with the zip code. Note: You can enter the zip code and the city and state will automatically be entered. |
| State | Optional | From the drop down menu; select the state that corresponds with the party’s city and zip code. Note: You can enter the zip code and the city and state will automatically be entered. |
| Zip Code | Optional | Enter the zip code of the address. Click on the Zip Code hyperlink to view zip codes currently on file. |
| This is a mailing address | Optional | Check this box if the address is used as a mailing address only and this is not the physical address of the plaintiff/defendant. |
| This is a foreign address | Optional | If this is a foreign address, check this box. |
| This is a non-public address | Optional | If this address should not be viewed by the public, check this box. This is used as a level of security, consisting of confidential, sealed, and sealed with indictment cases. This level of security will not allow the public or a user without security to access any of the party of case information. |
| Phone | Optional | This is the main contact telephone number of the plaintiff/defendant. This contains two fields. For the first field of information, use the drop down menu to select the type of phone number being recorded. i.e., Home, Work, etc. Then in the second field, enter the entire telephone number (area code, prefix, number). |
| Law Firm | Optional | Enter the name of the law firm for the plaintiff/defendant. |
| Attorney | Optional | Enter the name of the attorney for the plaintiff/defendant. If this is not applicable, (None) should be the entry here. Click on the Attorney hyperlink to add a new attorney or edit an existing attorney's information. Use the drop down menu to select an attorney currently on file. |
| Attorney is surety | Optional | Check this box if the attorney has agreed to be legally responsible for all costs or a 'set amount' on the case. There can be multiple sureties on a case. |
| Party is indigent | Optional | If the plaintiff/defendant is being declared indigent, check this box. |
| Pro Se | Optional | Check this box if the plaintiff/defendant is representing themselves. |
| Warnings | Optional | These are system generated. |
Step 4: Maintain or add other parties
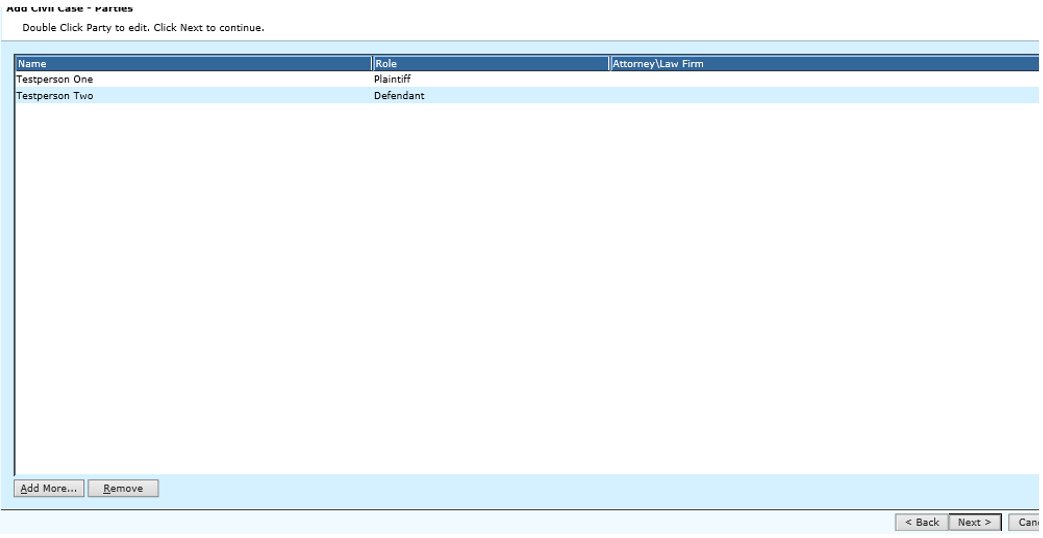
When the Plaintiff and Defendant information has been entered, this screen will be displayed and you can select to edit the parties' information, add other parties, or remove any of the parties listed. If you 'Add More', you will be prompted for the same information as in Step 3 except you will choose the role (Plaintiff or Defendant) of the individual/business. If all is correct, click the Next > button to proceed. You can click the <Back button to go back to the previous process screen. Cancel will delete all the case information and return to Step 2.
Step 5: Record filing information
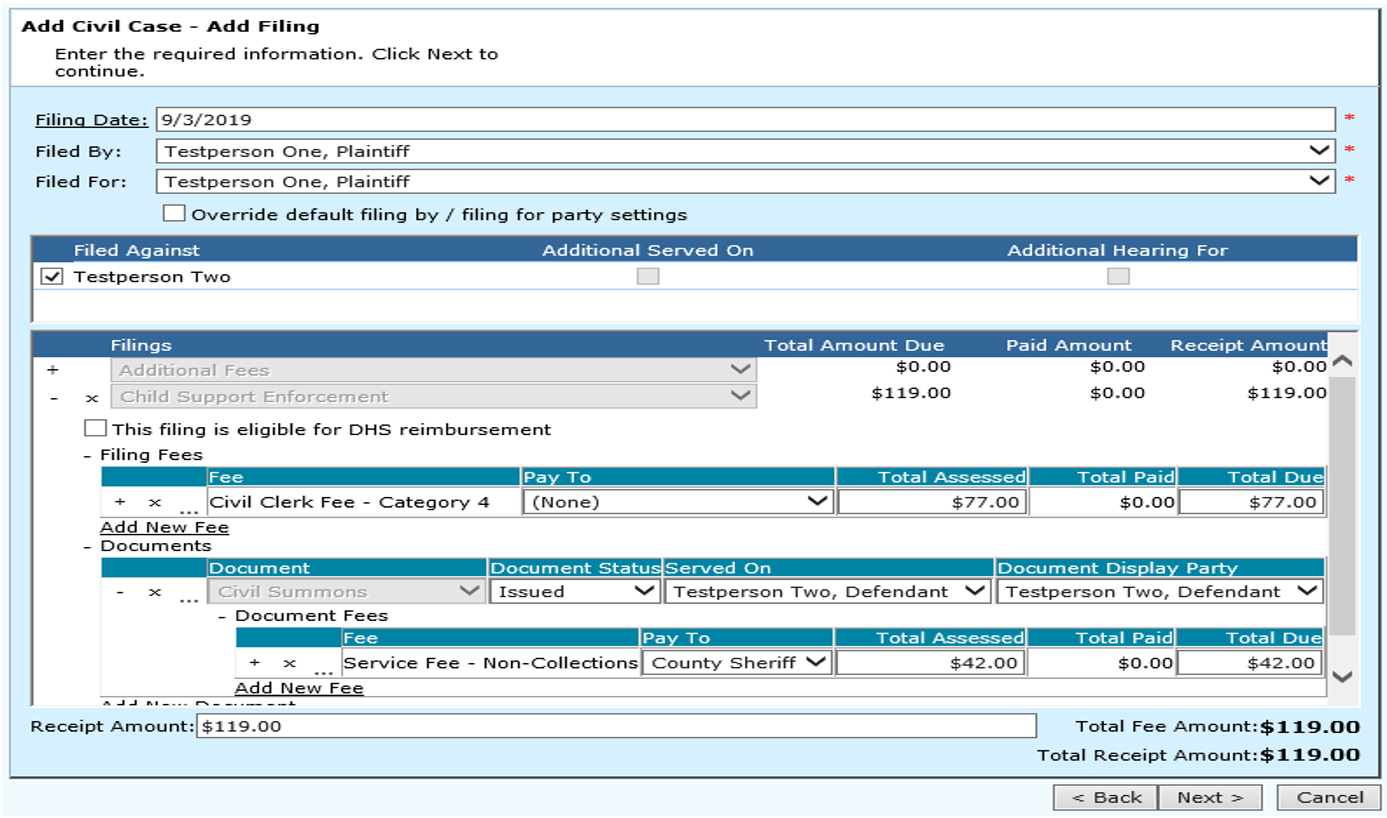
To select the filing, pick one from the filings drop down menu. (Tab) Fees will appear you can edit them as needed. Some fees will require a Pay To name to be entered (i.e., Pay To for Service on documents). The total amount will be displayed at the bottom of the screen. See the screen shot after field descriptions for additional detail. After recording all the information, Click the Next> button to proceed to the next step. Note: You must Tab or click off the filing after you select it for the fees to drop in.
Field Descriptions:
| Filing Date | Required | Enter the date the case is physically being filed. The current date will be displayed. To enter another date, make the entry or click on the Filing Date hyperlink to make a date selection from a calendar. |
| Filed By | Required | Enter the name of the person filing the case. Use the drop down menu to select from names currently on file. Generally, it is the plaintiff or plaintiff's attorney that files the document that generates a new case, but any party can file the initial filing for a civil case. |
| Filed For | Required | Enter the name of the person who this case is being filed for or the person that originated the case. Use the drop down menu to select from names currently on file. This is required even if the filing is being processed without payment. |
| Check box Override default filing by / filing for party settings | Optional | This check box if marked will allow the Filed By and Filed For to be different parties, even if Filed By is not an attorney. This can be manually enacted by the user by using the check box to override. |
| Filed Against | Required | The names of the people involved in the case will be displayed and you will check the person to whom this case is being filed against. To select all names listed, check the box beside ‘Filed Against’. |
| Filings/Fees | Required | These individual filing fees are the amounts charged against the case and can be flat fees or itemized fees. To select one of the filing fees, click the desired filing in the drop down menu. When you select the filing, tab or click off the filing and the fee information will appear and you can see the detailed fee amounts and make any necessary changes or entries. These can either be accrued or paid up-front. Any filing fee that has the (+) sign to the left of it means there is another line of fee information to be seen. Click the (+) to see that information. |
| This Filing is Eligible for DHS Reimbursement | Optional | Check this box if the filing eligible for DHS reimbursement. Another field will appear with a preset eligible amount for the filing selected. This will place that amount into a DHS Reimbursement Form for reporting. If checked, an amount field will appear with a preset amount or no amount. The user can enter/edit that amount. |
| Receipt Amount | Optional | A receipt amount may be entered in this field if the filing must be paid upon entry. If the filing can be paid at a later time and the party does not wish to pay up front, you can enter a $0.00 in the field and continue without receipting money. |
Step 6: Make any other changes to the “Filings” information
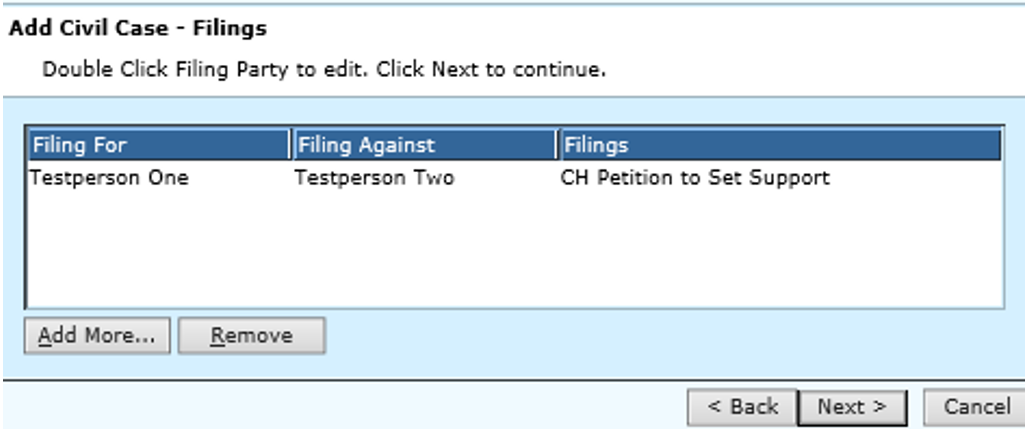
When the filing information has been entered, this screen will be displayed, and you can go back and make any necessary changes. To make changes, double click on the filing. Click the Add more button if an additional filing must be made. If a filing was entered in error, click that filing and click the remove button and answer yes if you wish to remove the filing. If all the information is correct, click the Next> button to proceed to the next step.
Step 7: Enter Receipt Information
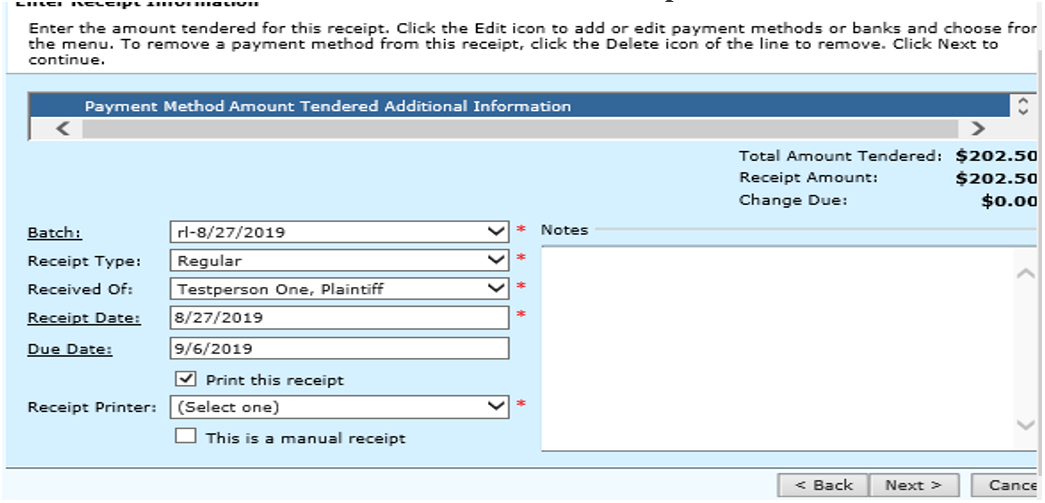
Enter the necessary information about the receipt. Required information will be a payment method, batch id, receipt type, received of, receipt date and printer (if printing the receipt).
Once information has been entered then click Next to proceed.
Field Descriptions:
| Payment Method | Required | From the drop down menu, select the payment method for the payment being made on the case. If you select Check or Money Order, you will also be prompted to enter the check number and the bank name (bank name is optional). If you select Credit Cards, you will be prompted to enter the card number and the expiration date. You may have multiple payment methods on one receipt, such as a $10 in cash and $10 by personal check. |
| Amount Tendered | Required | This is the total amount of the payment received for payment. If the amount received is more than the amount owed, the overage will show as 'Change Due'. If overage should be paid by check, check the box that says, “Issue check for change”. (Creates a disbursement) |
| Batch | Required | This is the code designated for the batch that includes this payment. If the correct batch is not automatically displayed, use the drop down menu to select a batch currently on file. To add a new batch or edit the one selected, click on the Batch hyperlink. |
| Receipt Type | Required | If the correct receipt type is not automatically displayed; use the drop down menu to select the type of receipt being issued for this filing. |
| Received Of | Required | This is the name of the person making the fee payment. This defaults to the name in the 'Filed For' field. If the correct name is not automatically displayed, use the drop down menu to select. |
| Other Received Of | If the receipt is received of someone other than the case parties i.e., attorney or other individual, they will be entered in this field. This field will only appear if the ‘other’ option is selected from the received of drop down. | |
| Receipt Date | Optional | System will default the batch date as the Receipt Date. If the receipt date is changed, it will only affect the receipt being processed. This may be necessary when entering manual receipts created on a previous day. To enter another date, make the entry or click on the Receipt Date hyperlink to make a date selection from a calendar. |
| Due Date | Optional | If the receipt creates a disbursement for restitution or judgment, this is the date that disbursement is to be paid out for the “on demand” checks. The due date can be changed. |
| Print this receipt | Optional | Check this box if a receipt is to be printed. |
| Receipt Printer | Required | Use the drop down menu and select the printer that this receipt will print to. |
| This is a manual receipt | If a manual receipt was written and you are just recording the information, check this box. If this selection is made, you will also enter the reason and the manual transaction number for the manual receipt. Use the drop down menu to select from reasons on file. Use the Reason hyperlink to add a new reason or edit the reason selected. If the reason is Other, you will be required to make an entry explaining the other reason. | |
| Notes | Optional | This field is for any miscellaneous notes or information that you want to keep about this case or receipt. |
Step 8: Enter Rule Docket Information
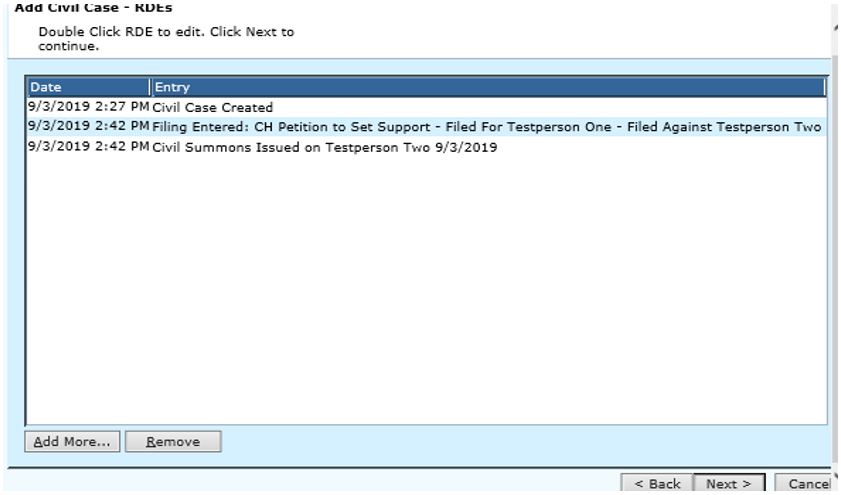
Verify automatic rule docket entries. To edit, double click the appropriate line. To add a new RDE, click the Add More button. To delete one of the RDEs, select the appropriate line and then click the Remove button. If all is correct, click the Next > button to proceed. You can click the <Back button to go back to the previous screen. Cancel will delete all f the charge information and return to Step 2.
Field Descriptions:
| Date | Required | The current system date is defaulted into the field. This date can be modified. Enter the date of the rule docket entry. Click the Date hyperlink to select the date from a calendar. |
| Time | Required | This is the time of the rule docket entry. |
| Entry | Required | The default entry type will be displayed. For example, a new case entered would be shown as Case Creation. The user can enter additional information using the Entry text box. Click the Entry hyperlink to view entries currently on file and make a selection or add a new entry type. |
| Notes | Optional | Enter any miscellaneous notes or comments about this rule docket. |
| Add more | Optional | Click this button to add another rule docket. |
| Remove | Optional | Highlight an RDE and click this button if you wish to remove an RDE. |
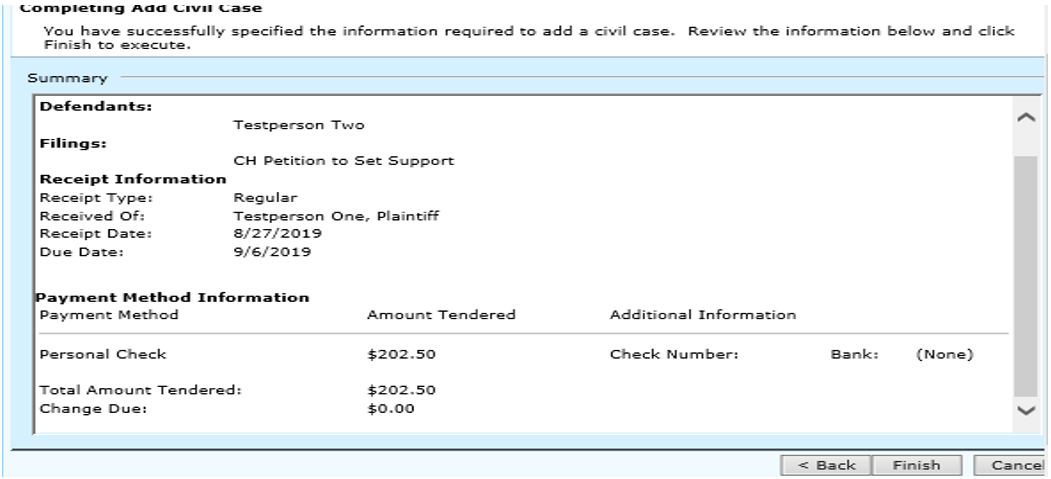
Step 9 Review case information
At the completing Add Civil Case screen, review the information and click Finish to complete and print receipt if money was received.
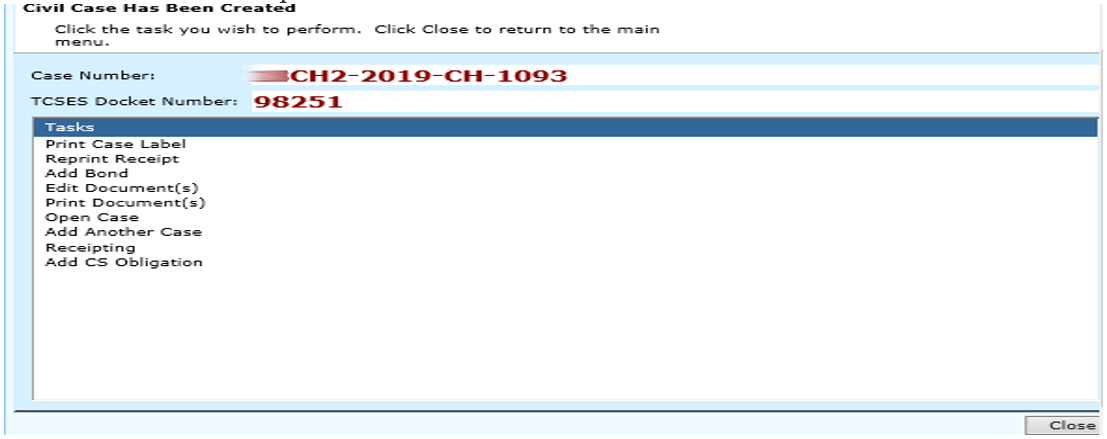
Step 10: Perform related processes (Tasks)
After the receipt is printed, you can select to go into any of the options pertaining to this civil case. Select one of the options or click Close to end and return to the main TnCIS menu.
Rev. 10/19/2021